How to Make a Cake from Scratch: The Ultimate EASY Guide
Updated Nov 20, 2023
In this complete guide to “How to Make a Cake from Scratch“, you’ll learn the essentials of cake-making, from the basic ingredients and tools required to step-by-step instructions and troubleshooting tips. Let’s get started!
Why Make a Cake from Scratch?
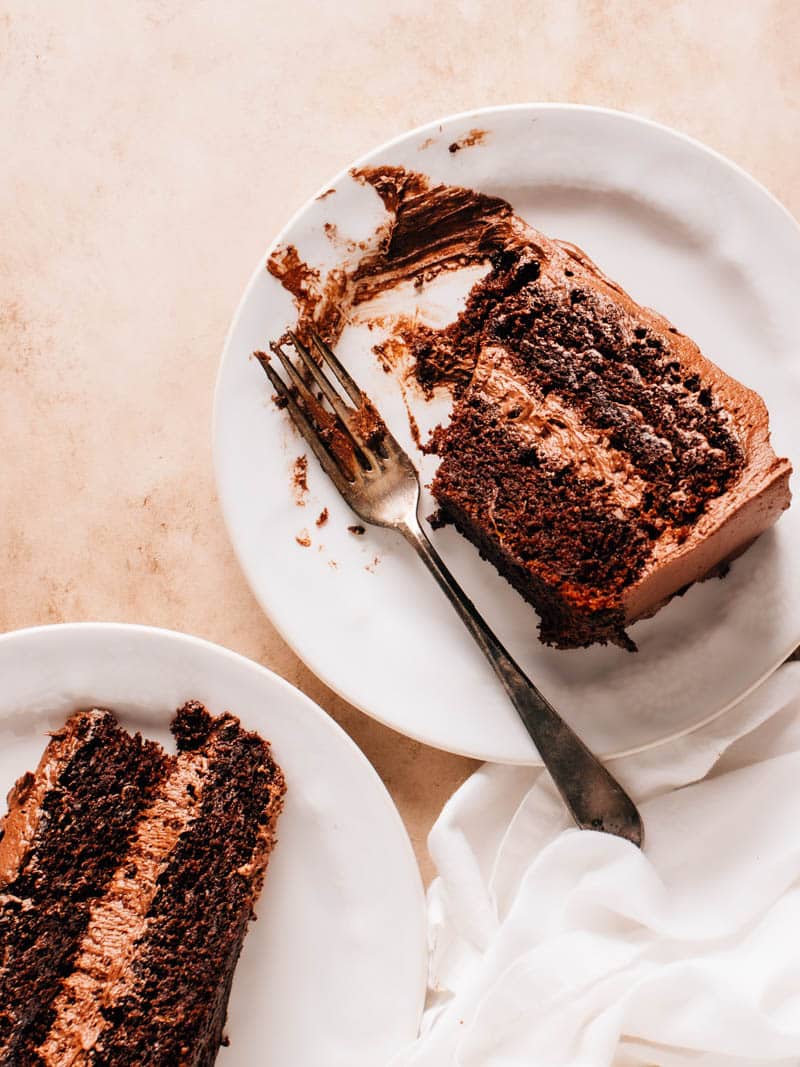
The benefits are clear: better flavor, control over ingredients, and the satisfaction of creating something yourself. Trust me, nothing beats this Moist Chocolate Cake. NOTHING.
- SO MUCH BETTER than Store-Bought or Cake Mix: When you make a cake from scratch, the flavors are fresher and more delicious. There are no artificial preservatives or flavor enhancers; it’s all you and your ingredients, making the end result noticeably better.
- Control Over Ingredients: Making a cake yourself means you know exactly what’s going into it. This is especially useful if you’re dealing with dietary restrictions or allergies. Plus, you can adjust sweetness, flavors, and textures to your liking.
- Skill-Building: While it might seem daunting at first, making a cake from scratch is a great way to build your kitchen skills. You’ll get hands-on experience with mixing, measuring, and baking, skills you can apply to other cooking projects. So satisfying.
Essential Ingredients for Homemade Cake
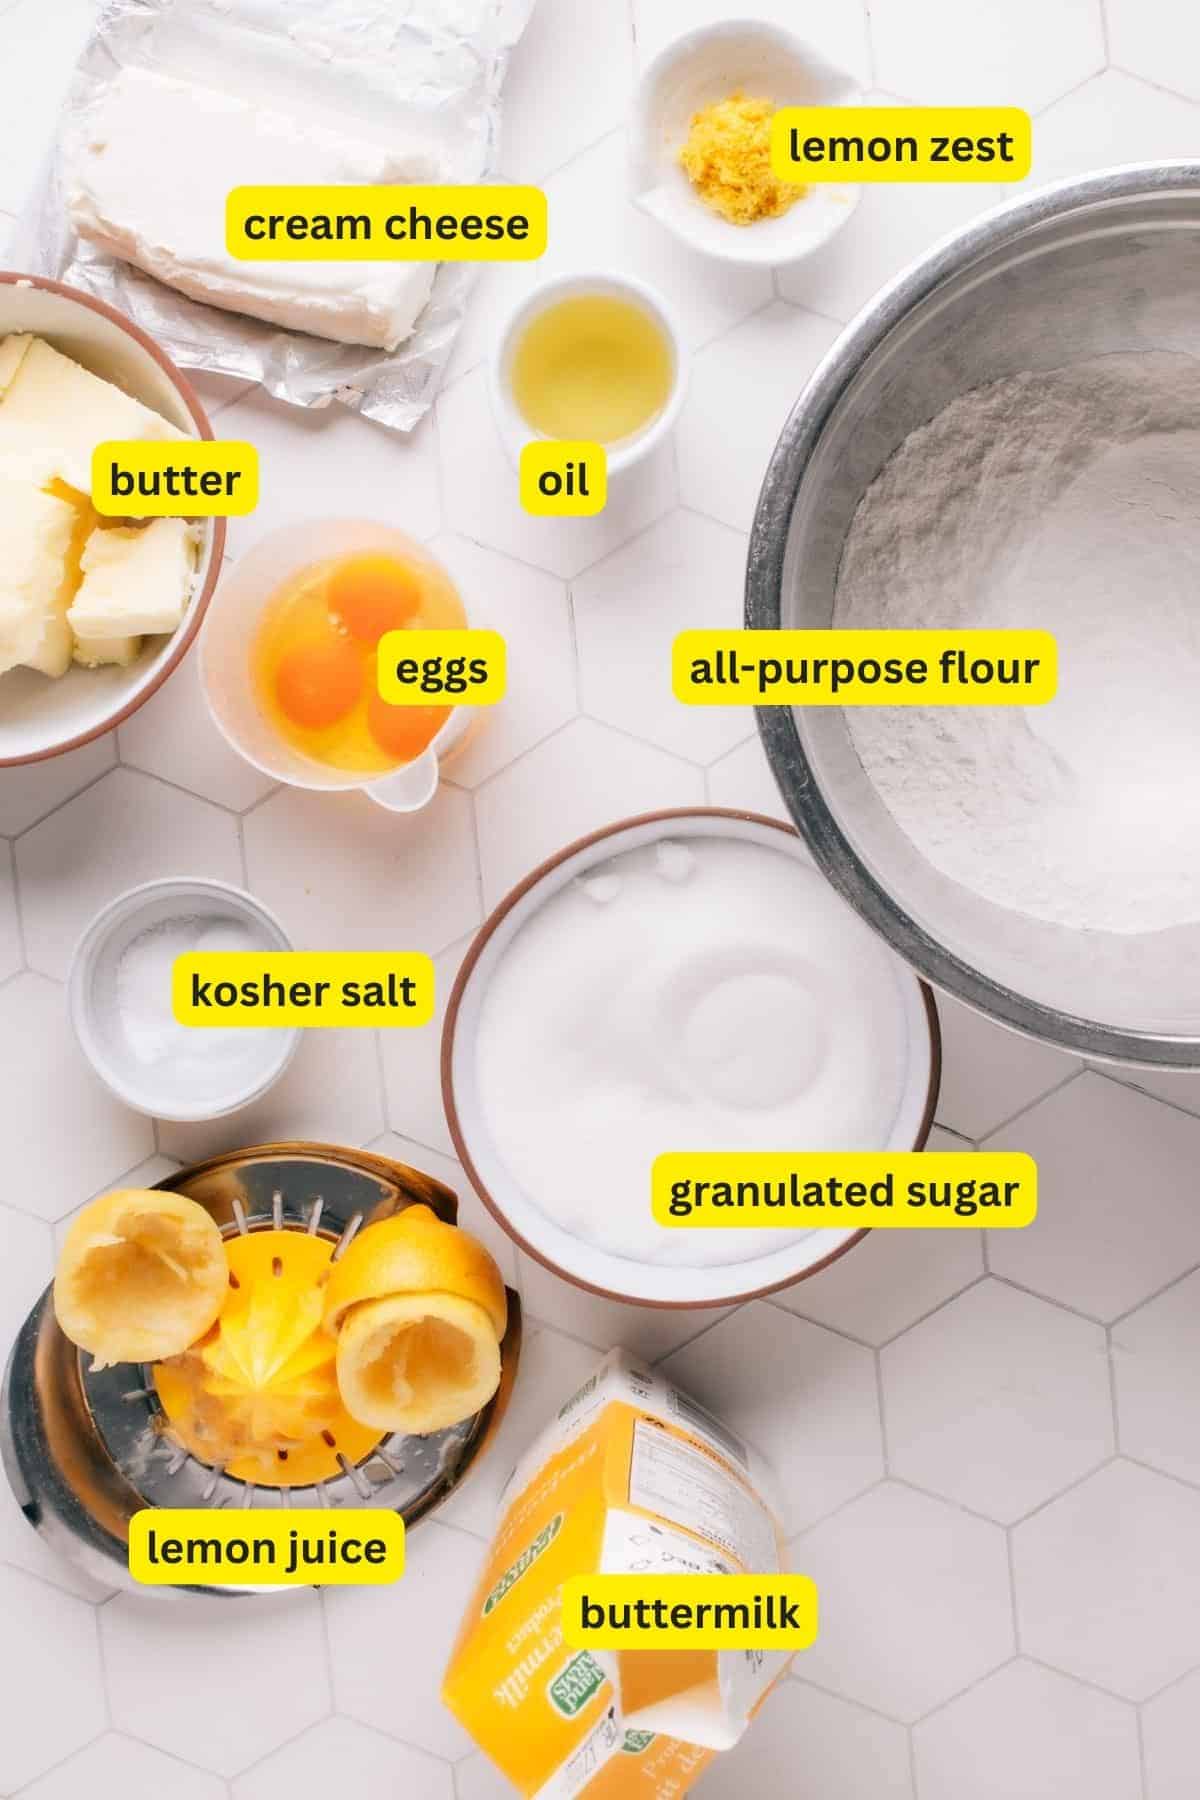
- Flour: This is the backbone of your cake, providing structure. All-purpose flour is generally fine, but cake flour can give you a softer crumb.
- Sugar: Granulated sugar is what you’ll use most often. It doesn’t just sweeten the cake; it also aids in browning and flavor. Plus, did you know that sugar turns to liquid in the heat of the oven? It adds moisture that way, too. In fact, in one of my university food science labs, we were taught to think of sugar as a liquid ingredient, not a dry ingredient.
- Eggs: Eggs contribute to the structure and moisture of the cake. They also help with leavening and flavor. (See the best egg substitutes here.)
- Fat: It brings the flavor and richness. Often, it’s butter, and some recipes also include other fats, like oil and/or cream cheese (like in my Lemon Curd Cake recipe, where the combination of fats ensures a soft, tender crumb).
- Milk or Buttermilk: Some recipes call for added dairy ingredients, while others get enough moisture from the fat and eggs. (See the best buttermilk substitutes here)
- Leavening Agents: This means baking powder, baking soda or sometimes yeast or whipped egg whites. They make your cake rise, giving it that light, fluffy texture.
- Flavorings: Vanilla extract is a common one, but you can get creative with other extracts, spices, or citrus zests.
Room Temperature Matters: It’s really important for these ingredients to be at room temperature. If your butter is too cold, it won’t cream properly, and if your eggs are too cold, they can cause the butter to solidify into little lumps. Room-temperature ingredients combine more easily and create a smoother, more cohesive batter. Here’s how to quickly bring ingredients to room temperature.
Tools and Equipment Checklist
- Mixing Bowls: You’ll need at least two: one for dry ingredients and one for wet.
- Measuring Cups & Spoons: Accurate measurements are crucial in baking.
- Stand Mixer: While you can mix by hand, an electric mixer makes it SO much easier and more consistent.
- Cake Pans: Depending on the type of cake, you’ll need the right shape and size.
- Rubber Spatula: This helps you scrape every bit of batter into your cake pan.
- Cooling Rack: Important for letting your cake cool down properly before frosting.
How to Make a Cake From Scratch in 5 Simple Steps
Making a cake from scratch isn’t just for seasoned bakers; it’s something anyone can do. As a food scientist and professional test kitchen recipe developer, it’s my passion to simplify the science of baking so that everyone can have baking success!
Step 1: Preparing Your Oven and Pans
Preheating the Oven: Before you dive into mixing your ingredients, make sure to preheat your oven to the temperature specified in the recipe. This is crucial because starting with a hot oven ensures that your cake will rise properly and cook evenly. Usually, it takes about 10-15 minutes for an oven to preheat, so doing this first gives you time to prep other things.
Greasing and Flouring Cake Pans: The last thing you want is for your cake to stick to the pan. To avoid this, grease your pan thoroughly with coconut oil or cooking spray. After greasing, add a small amount of “dusting agent” to the pan.
The traditional dusting agent is of course flour (hence the instruction to “grease and flour your pans”).
I personally prefer to dust my pans for chocolate cakes using cocoa powder, and flour my other cake pans using almond flour. This prevents a gummy white residue on the finished cake that is caused by regular flour.
Whatever flour or non-flour option you use to flour your pans, tilt and tap the pan to spread the flour evenly, covering all greased surfaces. Shake out any excess flour. This extra layer helps create a barrier between the cake and the pan, making it much easier to remove the cake after baking.
Step 2: Mixing the Ingredients
There are 3 common methods for making cake: the first is the “Cake Method,” which involves creaming butter and sugar first. The easiest is the “Muffin Method,” which doesn’t require creaming (just mixing of dry ingredients and wet ingredients separately first combining. The third is lesser known, but is my favorite discovery. It’s called “Reverse Creaming” and this method produces the most moist vanilla cupcakes and best vanilla cake ever.
Cake Method
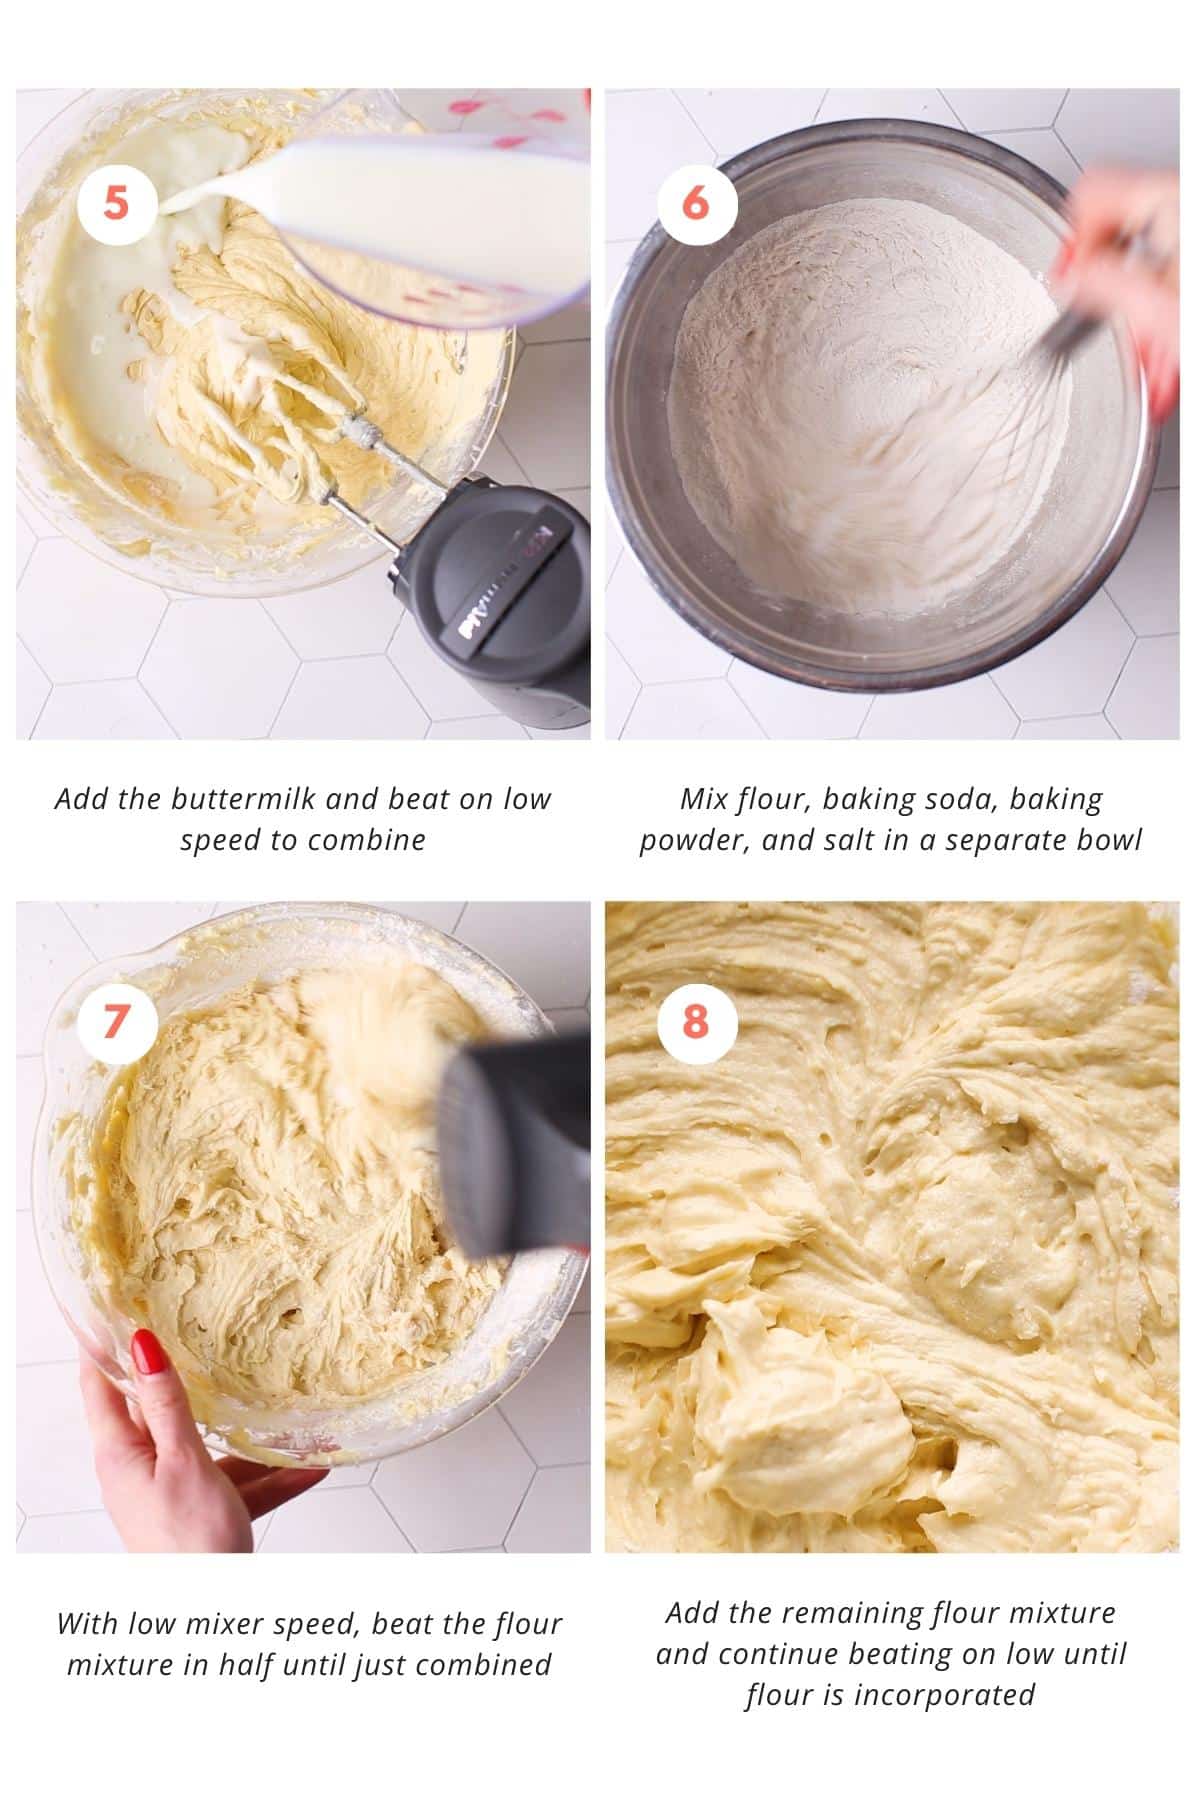
In many traditional cake recipes, you’ll start by creaming the butter and sugar together until they’re light and fluffy. This incorporates air into the mixture, which helps the cake rise. After the creaming is done, you typically add eggs one at a time, making sure each is fully incorporated before adding the next.
Then, you’d add your liquid (like milk or buttermilk) to complete the wet ingredient mix. This method is common in recipes for butter cakes, pound cakes, and many layer cakes.
SECRETS TO SUCCESS
- Room-Temperature Ingredients: Make sure your butter and eggs are at room temperature for better mixing and a more consistent batter.
- Paddle Attachment: Use the paddle attachment on your stand mixer for the creaming process. It’s designed to help aerate the mixture better than regular beaters.
- Scrape Down the Sides: Periodically scraping down the sides of the bowl ensures that everything is evenly mixed. Don’t overlook this simple step.
- Add Eggs One at a Time: Adding one egg at a time helps to keep the mixture emulsified, so it doesn’t break or curdle.
- Don’t Overmix: Once you add your dry ingredients, mix until just combined. Overmixing can develop gluten and make your cake tough.
Muffin Method
The Muffin Method is a quicker, simpler technique often used in recipes like muffins, quick breads, and some simpler cakes. In this method, you mix all your wet ingredients together in one go—there’s no creaming of butter and sugar.
Often, you’ll melt the butter so you can easily mix it with the eggs and liquid. Because you’re not creaming the butter and sugar to add air, cakes made with this method are usually denser and have a more uniform crumb.
This is the simplest of all methods you can use. Start here if you’re a beginner! Using this technique, you can make amazing Moist Chocolate Cake and Moist Carrot Cake that are totally failproof.
SECRETS TO SUCCESS
- Pre-Mix Wet and Dry: Pre-mixing the wet and dry ingredients in separate bowls ensures an even distribution of ingredients when they’re combined.
- Gentle Mixing: Unlike the Cake Method, motorized tools are not your friend here. Hand mix ingredients using a big spatula until just combined to avoid activating too much gluten, which is the fastest way to make cake tough.
- Don’t Overfill: When using this method, it’s easy to end up with a batter that rises a lot. Only fill your cake pan 2/3 full to avoid overflow.
- Hot Oven: A hot oven helps the batter set quickly, capturing the moisture and making the cake moist.
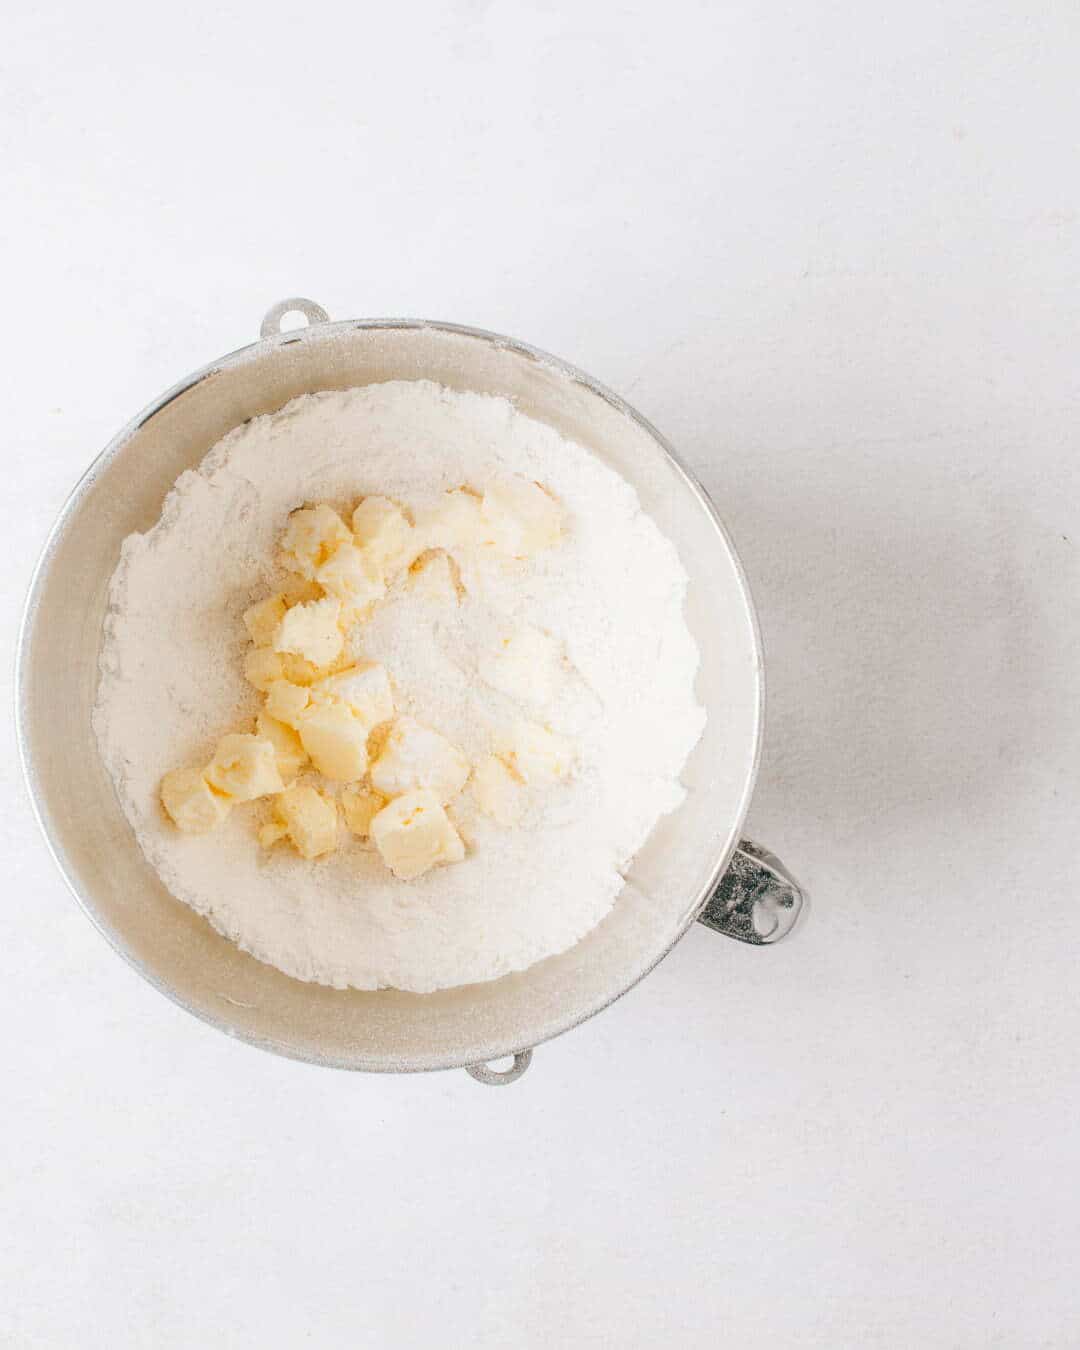
Reverse Creaming Method
The Reverse Creaming Method flips the traditional cake method on its head. Instead of creaming the butter and sugar first, you start by mixing your dry ingredients and sugar together. Then, you add chunks of room-temperature butter into the dry mix, blending until the mixture looks like coarse sand. Finally, you’ll add your wet ingredients, which often includes eggs and a liquid like milk or buttermilk.
This method is known for producing cakes with a tender crumb and a slightly denser texture compared to cakes made with the traditional creaming method. It’s often used in recipes where a fine, tight crumb is desirable, such as buttery yellow cakes (like this Moist Vanilla Cake) or certain types of pound cakes.
Ultimately, the method you use will depend on the type of cake you’re making and the texture you’re aiming for. The Cake Method generally gives you a lighter, fluffier texture, while the Muffin Method is quicker and results in a denser cake. The Reverse Creaming Method can be a great alternative depending on the texture and structure you’re looking for in your cake.
SECRETS TO SUCCESS
- Dry Ingredient Consistency: Make sure your dry ingredients are well-sifted and combined before adding the butter to prevent lumps.
- Cold Butter: Room temperature or even slightly colder butter helps create a sandy texture when mixed with the dry ingredients.
- Low Speed: Start mixing on low speed when adding the butter to prevent flour from flying out of the bowl.
- Add Liquids Slowly: Add your wet ingredients in stages, starting with a small amount to make a thick paste, then adding the rest to form the batter.
- Check Texture: After combining, your batter will look a little bit curdled. That’s normal and ok! Don’t overmix trying to make it totally smooth.
Step 3: Baking the Cake
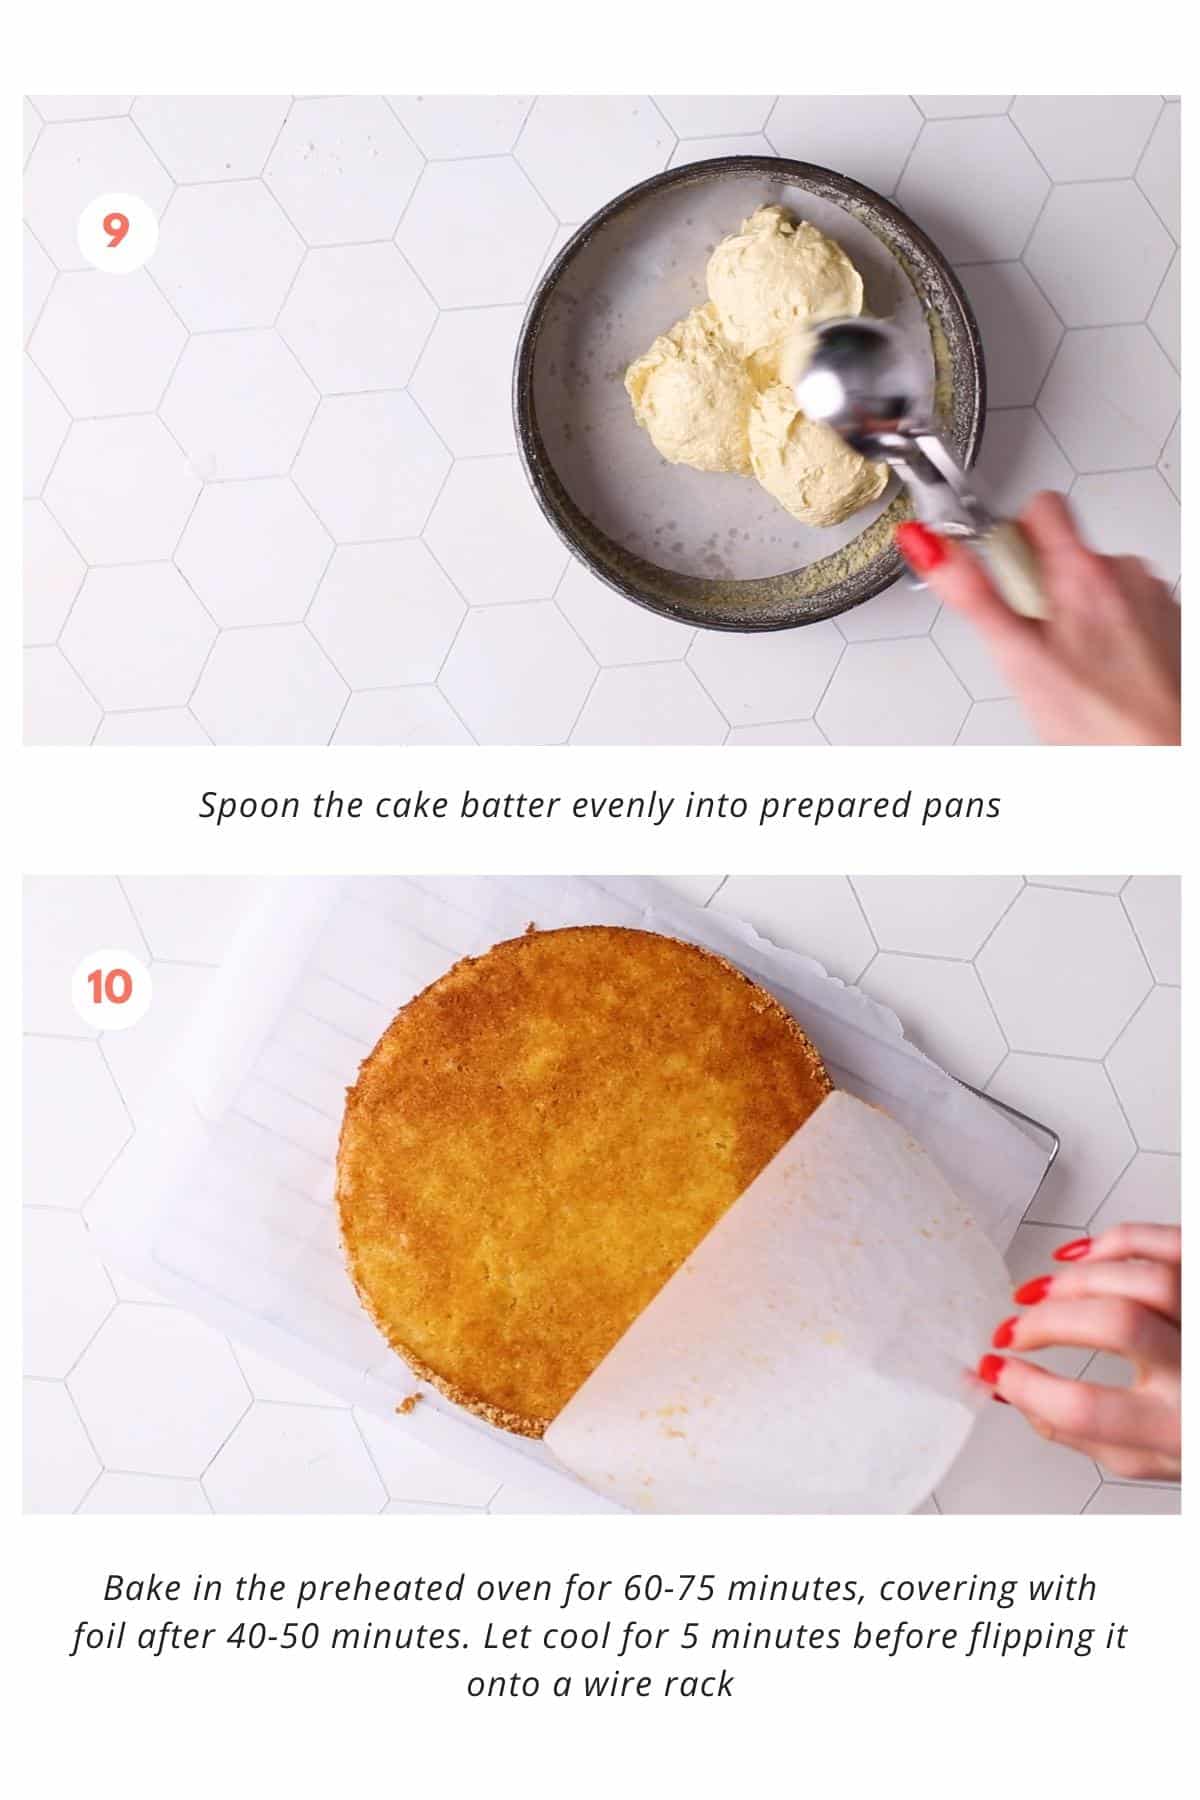
Once your batter is ready, it’s time to pour it into your prepared cake pans. Use a spatula to scrape down the sides of the bowl, making sure you get every last bit. If you’re making a layer cake, try to distribute the batter as evenly as possible between the pans. This ensures that all the layers bake at the same rate.
Even baking is crucial for a successful cake. A few tricks for this include rotating your cake pans halfway through the baking time, and if you have more than one cake pan in the oven, switch their positions. This compensates for any hot spots in your oven.
Baking time can vary due to differences in ovens and the specific recipe you’re using. Always consult your recipe for the most accurate timing.
Step 4: Testing for Doneness
Knowing when your cake is done is vital. One common test is the toothpick test: insert a toothpick into the center of the cake. If it comes out clean or with just a few crumbs, your cake is done. Another method is the touch test. Lightly press the center of the cake; if it springs back, it’s ready.
However, if you’re looking for the most foolproof method, a probe thermometer is your best bet.
A perfectly done cake will register around 190 F when inserted into the center. This takes the guesswork out of the process. It ensures that your cake is fully baked without losing any more moisture than necessary. Keep in mind that the liquid turns to steam as the temperature rises. That steam is moisture lost forever from your cake.
Step 5: Cooling and Frosting
After your cake is done baking, don’t rush to get it out of the pan. Let it sit for about 10 minutes. This allows the cake to firm up a bit and makes it easier to remove without breaking.
It also allows the steam from the hot cake to help it release from the bottom of the pan.
After that, run a knife around the edge of the pan to loosen the cake. Place a sheet of parchment paper on top of the cake, place a wire rack on top of the paper, then use oven mitts to flip the whole thing over. (Read more here, with Parchment Paper 101: Everything You Need to Know).
Doing this is the most gentle way to turn it out onto a cooling rack. Lining the wire rack with parchment paper prevents the hot cake from sticking to the rack or getting unattractive grooves.
It’s crucial to let the cake cool completely before frosting; otherwise, the frosting can melt and make a mess. As for frosting, you’ve got options. Homemade vanilla frosting is a classic choice, but my favorite is this fluffy chocolate frosting recipe.
Final Words
So there you have it, 5 straightforward steps to making a killer cake from scratch. Don’t be afraid to experiment with different flavors, fillings, and even shapes. Whether you’re a beginner or an experienced baker, the joy of making a homemade cake is something everyone can savor.
Next up:
Favorite Recipes to Try
Now I will leave you with some standout cake recipes that have been tried and tested to perfection! Here are some top picks, straight from the feedback of readers like you:
- Moist Chocolate Cake: This one has been a standout feature on the Foodess blog since 2009 and boasts a ton of rave reviews. Definitely worth a try!
- Moist Vanilla Cake: After years of tinkering in the kitchen, I finally nailed down the vanilla cake recipe of my dreams, and it’s soft, fluffy, and moist.
- Portuguese Orange Cake: This is a hit with readers on the site. The cake is super moist and loaded with zesty orange flavor.
- Chocolate Orange Cake: Picture a fluffy chocolate orange frosting generously spread over a decadent chocolate cake. It’s as good as it sounds.
- Blueberry Pound Cake: It’s a soft, fluffy, and yes, moist cake bursting with blueberries that you’ll want to make over and over.
- Moist Carrot Cake: I know, I know, I keep using the word ‘moist,’ but when a carrot cake is this good and topped with fluffy cream cheese frosting, how else would you describe it?
- Lemon Curd Cake: Fluffy layers of lemon cake with bright, tangy lemon curd filling and 7-minute frosting. A.K.A “heaven”.
- Moist Vanilla Cupcakes: The best vanilla cupcakes I’ve ever had, and everyone who makes them agrees.


Have you tried this with stick margarine? I’ve got a friend that is allergic to butter so am always looking for alternatives.
Thanks!
Hi Cheryl, I do use margarine sometimes for vegan or dairy-free friends. When substituting stick margarine for butter in cake recipes, consider the following tips:
1. Choose a high-fat stick margarine: Ensure the margarine you choose has a fat content similar to butter.
2. Cream properly: Spend extra time creaming margarine with sugar to incorporate as much air as possible.
Best options in the US:
– Land O’Lakes Margarine Sticks
– Blue Bonnet Margarine Sticks
Best options in Canada:
– Becel Baking Sticks
– Imperial Margarine Sticks
All your receipes are fantastic i use nothing else thank you