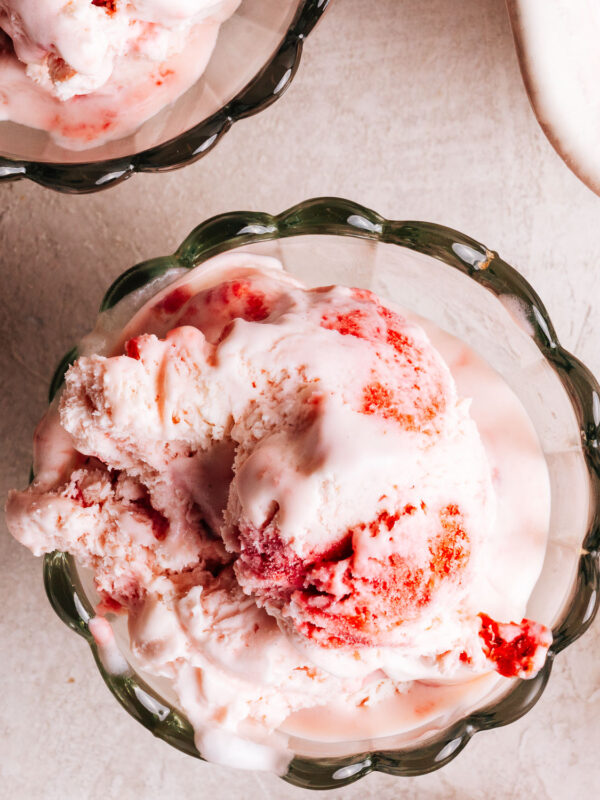
These creamy frozen yogurt popsicles are made with just 3 simple ingredients and super basic steps.

They make the perfect snack to pull from the freezer all summer long.
With 5 minutes of prep time and the yummiest dreamy berry and silky frozen yogurt result, let’s get to it!
Why You’ll Love This Yogurt Popsicles Recipe
Here’s why these NEED to be on your summer to-do list:
- 3 ingredients: All you need are yogurt, berries, and honey (or maple syrup), and you’ve got yourself ready to make this recipe.
- Kid-friendly: This is a fun treat to make with your kids and for them to enjoy eating in the summertime. They’re also a great alternative to ice cream!
- Make-ahead: Make these ahead of time and keep a big batch in the freezer – ready to go.
- So pretty: I love serving these in a big bowl with ice and berries scattered around them. They are super cute.
Here’s What You Need
There’s nearly nothing to making these treats; here’s what you’ll need:

Ingredients
Here are the 3 super basic ingredients you’ll need to make your frozen yogurt pops:
- Plain Greek yogurt: Provides a rich, creamy base for the popsicles with a tangy flavor. Use a thick, full fat and creamy yogurt for best results.
- Honey or maple syrup: Choose one or use a little of both to sweeten the popsicle mix.
- Fresh berries: Use one or a mixture of seasonal berries: strawberries, blueberries, and raspberries are delicious.
Substitutions and Variations
Here’s how to change up this yogurt popsicle recipe:
- Dairy-free options: Use plant-based yogurts such as almond, coconut, or soy yogurt for a dairy-free version. Ensure they are plain and unsweetened for best results.
- Agave nectar: A plant-based sweetener with a mild flavor, making it a good swap for both honey and maple syrup.
- Frozen berries: Use frozen strawberries, blueberries, or raspberries if fresh ones are not available. Thaw and drain excess liquid before using them in your Greek yogurt popsicles.
- Other fruits: Substitute with other fresh fruits like mango, peaches, or kiwi for different flavors.
- Add-ins: Play around with adding blended bananas, vanilla extract, lemon, fresh mint, or other frozen fruits for other tastes and textures.
Tools to Grab
- A blender: Or food processor to blend the berries with the honey.
- Popsicle mold: Silicone molds or plastic work well, or see below for easy options for DIY popsicle molds and sticks.
How to Make Yogurt Popsicles: An Easy Guide
Here’s how to make these silky yogurt popsicles:
Prepare the fruit
Puree the berries with 2 tbsp of the honey or maple syrup in a blender, an immersion hand blender in a measuring cup, or a food processor.
Prepare the yogurt
Add the plain yogurt to the remaining honey or maple syrup to a bowl and combine.

Layer and swirl
Add the mixture to each popsicle mold, alternating it with berries in layers. Swirl the mixtures together by inserting a skewer or super-thin knife. Create a marbled effect.
Freeze
Insert the popsicle sticks and freeze for 4-6 hours or until solid.

Make Ahead and Storage
Yogurt popsicles can be prepared well in advance, making them a convenient treat to have on hand. Mix the yogurt, sweetener, and berries as per your recipe, then pour the mixture into popsicle molds.

Storage
Once the popsicles are fully frozen, you can leave them in the molds until ready to eat. This keeps them protected and fresh.
After removing from the molds, wrap each popsicle in plastic wrap or parchment paper to prevent them from sticking together.
Place the wrapped popsicles in a large freezer-safe zip-top bag. Squeeze out as much air as possible before sealing to minimize freezer burn.
Alternatively, you can layer the popsicles in an airtight container, separated by parchment or wax paper sheets.
2 Common Mistakes When These Popsicles
Here are a couple trip-ups you’ll want to avoid:
- Over swirling: Too much swirling can muddle the layers, and you won’t get the pretty effect.
- Not freezing long enough: Ensure the popsicles are frozen for at least 4-6 hours or until completely solid. For best results, it’s recommended that they be frozen overnight.

DIY Popsicle Molds
You can easily make popsicles without traditional molds or sticks. Here’s how to make DIY molds for popsicles.
- Paper Cups: Use small paper cups as molds. Pour the mixture into the cups, cover with aluminum foil, and insert a stick through the foil. Once frozen, peel away the paper cup to enjoy your popsicle.
- Small Kids’ Cups: I have an embarrassingly-large assortment of IKEA tiny plastic cups for little kids. These make perfect DIY popsicle molds.
- Ice Cube Trays: Pour the mixture into an ice cube tray. Cover with plastic wrap or foil, and insert toothpicks or small sticks. These make mini popsicles.
- Silicone Muffin Molds: Any silicone mold, like those for baking, can work as a popsicle mold. The flexible material makes it easy to pop out the frozen treats.
- Muffin Tins: Pour the mixture into muffin tins, cover with aluminum foil or plastic wrap, make small slits for sticks, and freeze. Run warm water over the bottom of the tin to loosen the popsicles before removing. You can remove them all at once and freeze in a large freezer bag for longer storage.
DIY Popsicle Sticks
- Spoons or Forks: Use any small spoons or forks as handles. They work just as well and can be plastic/wooden or whatever you have in your cutlery drawer.
Final Notes, Pro Tips + Science-Based Secrets
Here are a few not-so-secret tips and tricks to try:
- Removing from molds: To remove the popsicles, briefly run warm water over the outside of the mold or let them sit at room temperature for a few minutes. Gently pull the popsicle stick to release. After removing the molds, wrap each popsicle in plastic to prevent them from sticking together.
- Properly fill the molds: Leave a small gap at the top of each mold to allow for expansion as the mixture freezes. Overfilling can cause a mess and make it difficult to remove the popsicles.
2 Tips for Holding Popsicle Sticks in Place
- Aluminum Foil or Plastic Wrap: Cover the popsicle mold with aluminum foil or plastic wrap. Make small slits over each mold and insert the sticks through the slits. This will help keep them upright while freezing.
- Wait Before Inserting Sticks: Partially freeze the mixture for about 30-45 minutes until it starts to set, then insert the sticks. This helps them stay in place.
FAQs About Yogurt Popsicles
Just whizzing through this recipe post? Check out these highlights:
If you don’t have popsicle molds, use small paper or silicone muffin cups. Insert popsicle sticks into the mixture once it starts to freeze (about 1 hour in) to ensure they stand upright.
To make dairy-free yogurt popsicles, use plant-based yogurt alternatives such as almond, coconut, or soy yogurt. Ensure they are plain and unsweetened to control the sweetness and flavor.
To easily remove popsicles from the molds, run warm water over the outside of the mold for a few seconds. This helps loosen them without melting. You can also let them sit at room temperature for a few minutes before unmolding.
Other Healthy Frozen Sweet Treats

Yogurt Popsicles (Quick, 3-Ingredient Easy Recipe!)
Video
Ingredients
- 2 cups plain Greek yogurt
- 8 tbsp honey or maple syrup divided use
- 1 ½ cup fresh berries (like strawberries, blueberries, raspberries or blackberries)
Instructions
Prepare the Fruit:
- Puree the berries with 2 tbsp of the honey or maple syrup in a small blender, with an immersion hand blender in a measuring cup, or using a small food processor.
Prepare the Yogurt:
- In a bowl, mix the plain yogurt with remaining honey or maple syrup until well combined.
Layer and Swirl:
- Fill each popsicle mold with alternating spoonfuls of yogurt and mashed berries. Use a skewer or thin knife to gently swirl the mixtures together, creating a marbled effect. Be careful not to overmix to keep the swirls distinct.
Freeze:
- Insert the popsicle sticks and freeze for 4-6 hours or until completely solid.
Notes
Nutrition
Nutrition information is automatically calculated, so should only be used as an approximation.


These popsicles are a game changer for post-run recovery in the heat. Love that they’re customizable with whatever fruit you have. Kudos on the recipe, going to be a staple this summer.
Totally agree, perfect balance of carbs and protein!
I’m a bit skeptical about the sugar content in store-bought yogurt. Making your own yogurt at home could be a healthier option, reducing added sugars and ensuring the probiotics are beneficial. What are your thoughts, Jennifer?
Hi Tina, I use plain yogurt without added sugar and it contains live probiotic bacteria. The good bacteria might not survive freezing anyway, though.
This recipe rocks! Made a batch for band practice, they were a hit. Cheers!
Can I use coconut yogurt for this? Just went vegan and I’m figuring out substitutes. Excited to try!
Hi Helen, yes you sure can!
Hello, I am excited to make this,but don’t know witch greek yogurt is best to use any suggestions,
Hi Jessica, I like to use plain full-fat Greek yogurt (3.5% milkfat) personally, but any kind that you like to eat will work!
looks easy enough
It’s great to see DIY popsicle molds being encouraged here. Reducing plastic use by making our own treats at home is something we should all consider. Any suggestions for biodegradable popsicle sticks?
Hi Julia, you can use wooden popsicle sticks (biodegradable) or use your own spoons from your cutlery drawer for zero waste.
Has anyone used blackberries? Did you remove seeds or just blend? If I press through a sieve will it be too juicy for this recipe?
Hi Kristine, I use blackberries, too! I don’t bother removing the seeds because they don’t bother me. Pressing through a sieve might make the juice too thin to swirl as nicely but it’ll still taste great!
imagine using fruit instead of chocolate chips, couldn’t be me lol
You’re missing out, fruit can be super sweet too!
Hey there, can I mix in some protein powder with the yogurt? Looking for ways to up my protein intake but still keep treats like this on the menu. Anyone tried this?
Hi Emma, yes you can! I’ve gotten messages from others saying they’ve done this. Great idea!
Regarding the nutrition info, could you specify the yogurt type used? I’m tracking macros and this would be super helpful. Thanks.
Hi Mike, the nutrition calculations are based on “low-fat plain greek yogurt” – I assume that means 2% but it doesn’t say specifically.
Love this recipe! Tried it with my kids and they couldn’t get enough. Easy and healthy, perfect for summer. Thanks, Jennifer!