Who loves Classic Nanaimo Bars as much as I do? My tested-till-perfect, traditional Nanaimo bar recipe includes lots of tricks for an ultra-fluffy filling and perfect layers.
Nanaimo Bars Origin
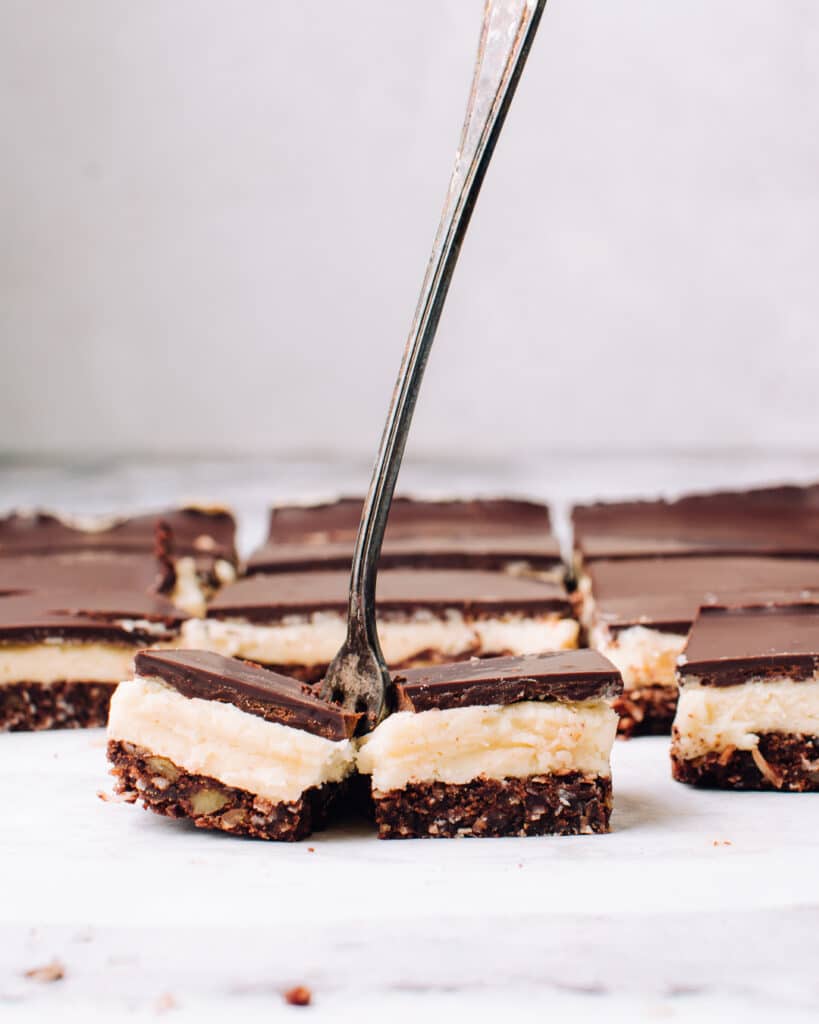
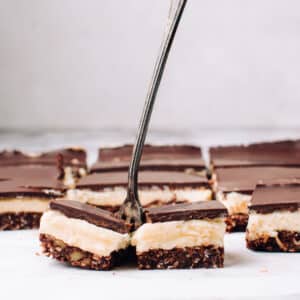
Nanaimo Bars were invented in the 1950’s in Nanaimo, British Columbia but are popular across Canada. I consider it BC’s best export. In these bars, a nutty, crumbly cocoa crust belies a cool, creamy whipped filling under a silky-smooth chocolate layer.
The chocolate shatters like a creme brulee as your teeth make contact and the layered structure gives way to a mouthful of fluffy, custard and chocolate-y crumbs.
Nanaimo bar filling traditionally includes custard powder – I opt out for two reasons: the first, it only comes in tubs much bigger than I need for Nanaimo bars, and what the heck would I do with the rest? I have seen enough expired custard powder in my mom’s pantry over the span of my childhood to know this is a single-use item and guess what? I have been making Nanaimos without it for years and have been told by many that they are the BEST EVER (*checks nails, slow tosses hair*). I hope you’ll forgive my bar bragging (bargging?) because I am totally willing to spill all of my secrets below.
And the second, the ingredient list is mostly just artificial flavour, colour and cornstarch. I just make a super-fluffy whipped vanilla filling (but in the recipe you have the option to add custard powder if you like!).
Nanaimo Bar Ingredients
It wasn’t until adulthood that I even knew what a nanaimo bar recipe consisted of. Who knew the base was cocoa, sugar, graham crumbs, coconut and nuts. No flour. Such an intriguing combination of flavours that you can’t quite put your finger on but can’t stop nibbling. Here’s what you need:
- Cocoa powder
- Sugar
- Coconut
- Toasted, chopped nuts (walnuts or pecans)
- Soft butter
- Confectioners’ sugar
- Vanilla
- Good quality chocolate (this makes a big difference)
- Vegetable oil (a touch of oil in the chocolate gives it extra sheen and keeps it just soft enough to bite through without the solid crack of a plain chocolate bar)
5 Tricks for Best-Ever Nanaimo Bars:
- For the base, toasting the nuts first builds a lot of beautiful, nutty flavour (vs. the raw, oily flavour of raw nuts). My friend Marnie, a chef, once muttered “why do people who don’t toast nuts even BUY nuts” and I hear her voice in my head every time I’m tempted to skip this step. I simply toast them while the oven is preheating.
- The ultimate trick for the filling is whipping the butter (WHISK ATTACHMENT only if using a stand mixer, paddle will never aerate enough) with confectioners sugar well past the point of combining.
- You want to really aerate that middle layer to a silky fluffiness. If you simply stop mixing when the ingredients come together, you’ll have a thick, over-sweet frosting, kinda pasty in texture. Not what we are going for. Just keep whipping. The mixture will turn a couple of shades lighter and take on a sheen. Then you’ll know it’s done and your patience will be rewarded. (And I will not be offended if you whip in two tablespoons of custard powder.)
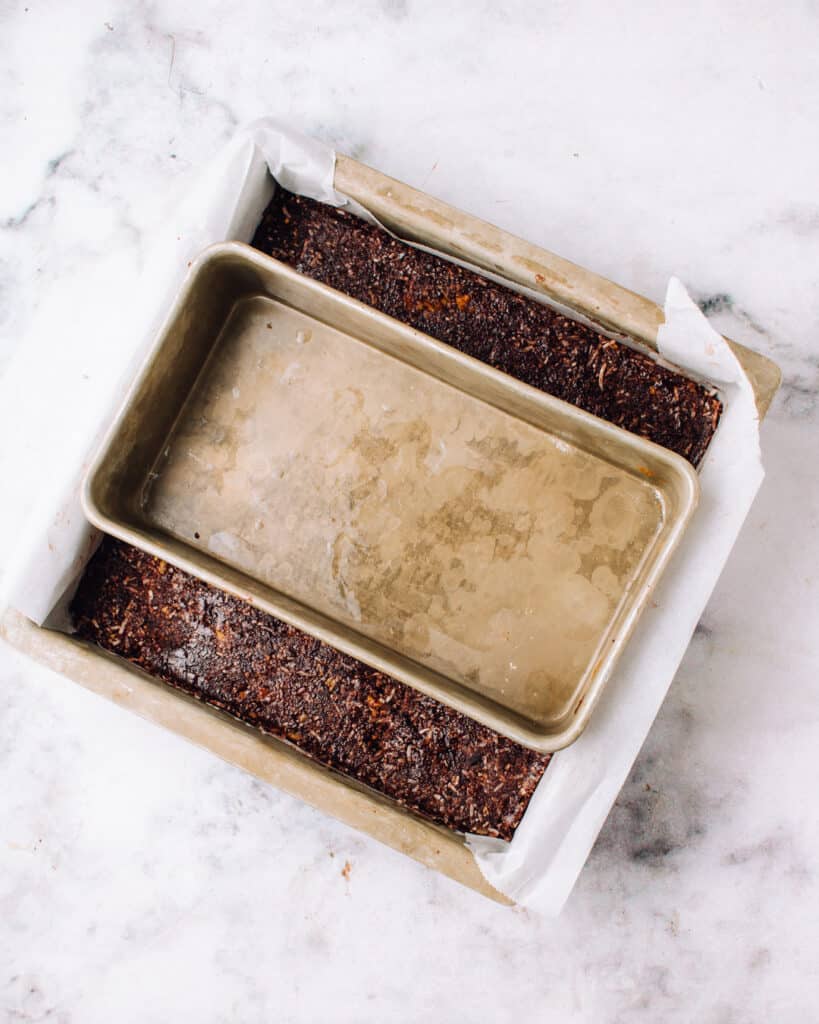
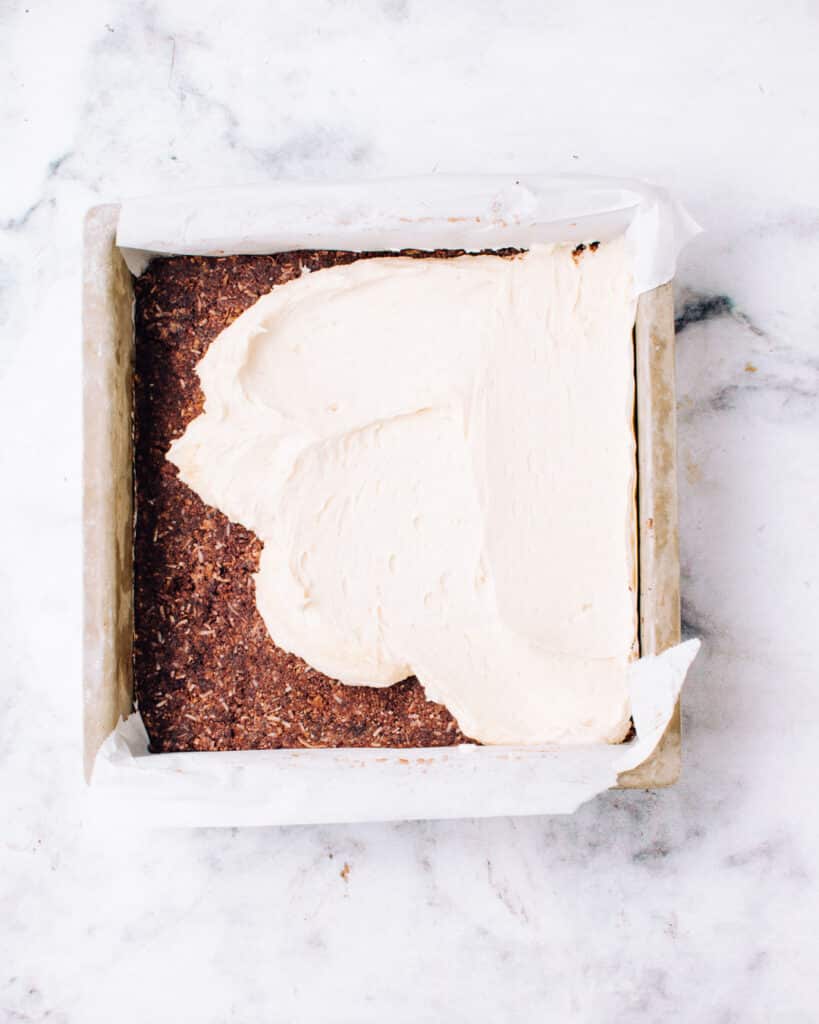
- To get really beautiful, tidy layers, use an oiled loaf pan that fits inside the baking pan used to make the bars. Simply oil a loaf pan, the press down the base while still hot, right after it emerges from the oven. Because it’s bound with egg, it puffs up in spots as it baked. Use the oiled loaf pan again to get the cream layer glass-smooth (you’ll need to be gentle and use side-to-side motion, not a downward press).
- To get a gorgeous, smooth top layer that you could skate on, do not touch the chocolate with a spoon, spatula, or ANYTHING. Simply pour the cooled-but-pourable chocolate over the chilled filling layer and just tilt the pan around to let the choclate spread naturally across the surface. Let the bars sit undisturbed at room temp until the chocolate hardens. Refrigerating warm-ish chocolate will likely cause (harmless) discolouration. That’s how you get bakery-looking nanaimo bars.
Storage Instructions
This Nanaimo bar recipe keeps well at room temperature for a couple of days, in the refrigerator for 5 days, or in the freezer for up to a month. You get the best mouthfeel if served at room temperature, but I am personally partial to an occasional frozen bar.
Looking for more cookie plate? I think you’ll love these:
Lemon Pistachio White Chocolate Cookies
Chewy Gingerbread Cookies (I make several pounds of this dough every year!)
Classic Nanaimo Bars
Ingredients
For base:
- ¼ cup unsweetened cocoa powder
- ¼ cup sugar
- 1 ¼ cup graham cracker crumbs
- 1 cups unsweetened shredded coconut
- ½ cup finely chopped pecans or walnuts
- ½ cup salted butter, melted
- 1 egg, lightly beaten
For filling:
- ⅔ cups butter softened
- 3 cups confectioners’ sugar
- 1 tbsp vanilla extract
- 5 tbsp heavy cream or milk
For topping:
- 8 ounces chopped dark chocolate
- 1 tbsp vegetable oil
Instructions
- Preheat oven to 350ºF. Line an 8×8″ square baking dish with parchment paper, leaving a 1″ overhang on all sides.
- In a medium bowl, stir together cocoa powder, sugar, graham cracker crumbs, coconut and nuts. Drizzle butter over top and toss with a fork to combine. Add egg and stir until well combined. Press the mixture into bottom of prepared baking dish and bake 10 minutes, until set. Use an oiled loaf pan to press the crust down into an even layer. Cool in the pan on a wire rack to room temperature.
- In a standing mixer fitted with the paddle attachment, combine butter, confectioners’ sugar, vanilla extract and cream. Beat for at least 2 minutes on high, until very fluffy and lighter in colour, scraping down sides occasionally.
- When crust is completely cool, spread filling evenly over top. Use the oiled pan again (wiping off any crumbs first) to gently smooth the filling to a flat, even layer. Transfer to freezer to firm up for about 10 minutes.
- In a microwave-safe measuring cup, microwave chocolate and vegetable oil on 50% power for 2 minutes. Stir, and repeat in 20 second intervals until 80-90% melted. Stir until smooth. Pour over chilled filling, tilting the pan to get it into all the corners. Let stand at room temperature without disturbing until chocolate is hardened.
- Lift bars out of dish by the parchment overhang. Run a sharp knife under hot water and towel dry between cuts to make clean slices and slice into 24 equal bars.
Notes
Nutrition
Nutrition information is automatically calculated, so should only be used as an approximation.


I am a newcomer to your site and am really enjoying your recipes.
I haven’t made these yet, but I definitely plan to for Christmas 2026. In your “5 tricks for …” you say to use the whisk attachment, but in the instructions, you say to use the paddle attachment. Can you confirm which attachment we should use? Should the whisk attachment be used for a hand mixer? Thank you –
Great catch, Louise — thank you! Use the whisk attachment. That’s the one that aerates the filling enough to get that signature silky fluffiness, which is exactly what’s explained in the tips section. I’ll get the recipe card updated. And yes, on a hand mixer the whisk-style beaters are what you want too. Beat well past the point of combining, until the mixture lightens in colour and takes on a sheen.
Thank you Jenn – I may not wait until Christmas after all – they look so good 🙂
yummmmmmm…Those look absolutely devine. Thanks for those recipe
I love your original post using powdered whole milk – genius!. I’ve adapted it to use 1 Tbl Birds custard powder or cornstarch + 2 Tbl powdered whole milk and people say it’s the best ever, so creamy. I score my bars with a pizza cutter before slicing and it helps make better cuts.
Hi Kim, I found the milk powder was a deterrent for many people so I left it out when updating the post (I honestly find them just as creamy without). But I’m glad you are enjoying the recipe! 🙂
Is there an option to cut the bars before pouring the chocolate on top and either drizzling them or dipping them in the chocolate? I’m worried about cutting them as nicely as you have! I feel like the hardened chocolate is going to crack all over. Thank you.
Hi Hikari, the chocolate has oil added so it does not crack like regular melted chocolate, it slices neatly like a super-thick fudge. If you follow the tip to use a knife run under hot water then dried between slices, you’ll get tidy slices 🙂 I wouldn’t drizzle or dip individual bars.