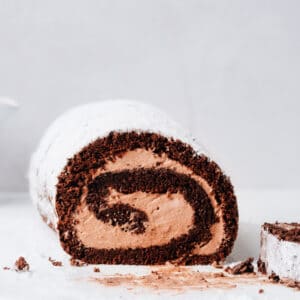
An easy Chocolate Swiss Roll Cake recipe with soft chocolate sponge cake filled with fluffy chocolate cream. My simplified rolling steps make it foolproof!
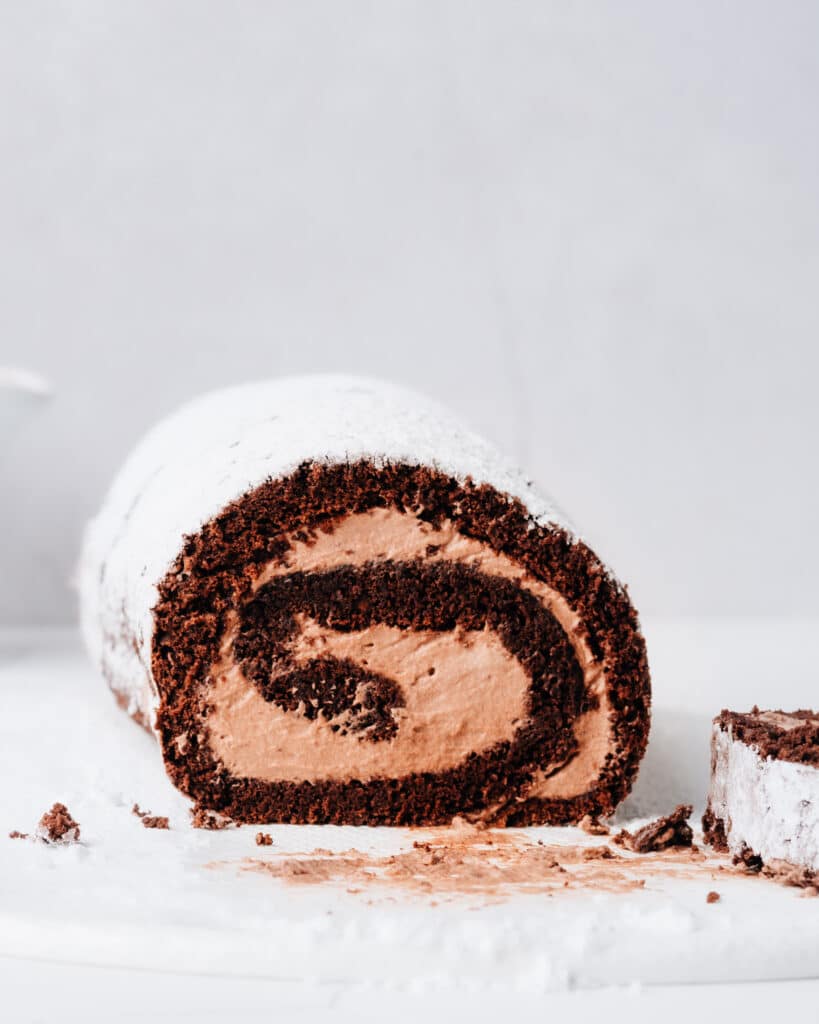
I adore an airy, cream-stuffed sponge cake like this Chocolate Swiss Roll.
While the separating and whipping of the egg whites and yolks is a bit more finicky than my famous Moist Chocolate Cake, it is totally worth the payoff.
The cloud-like chocolate sponge cake stands up to slicing through a pillowy chocolate cream filling. The contrast between rich cream and feather-light cake is just so good!
Ingredient Details to Note:
- There’s no oil or butter in the cake.
- Eggs: be sure to warm them from the fridge for best whipping. Here’s my pro method for bringing ingredients to room temperature super quickly.
- Granulated sugar: note we are dividing the measurements between the whites and the yolks. Sugar dissolves and stabilizes egg foams.
- Cocoa powder: for rich, dark chocolatey flavour. (Either Dutch-processed or not is fine for this recipe)
The filling is a simple, 4-ingredient whipped cream:
- Whipping cream: it should be cold from the fridge for optimal whipping (opposite to eggs).
- Confectioners’ sugar: which dissolves more readily in the cream, and also has a bit of cornstarch which helps to stabilize the whipped cream.

How to Make A Chocolate Swiss Roll Cake
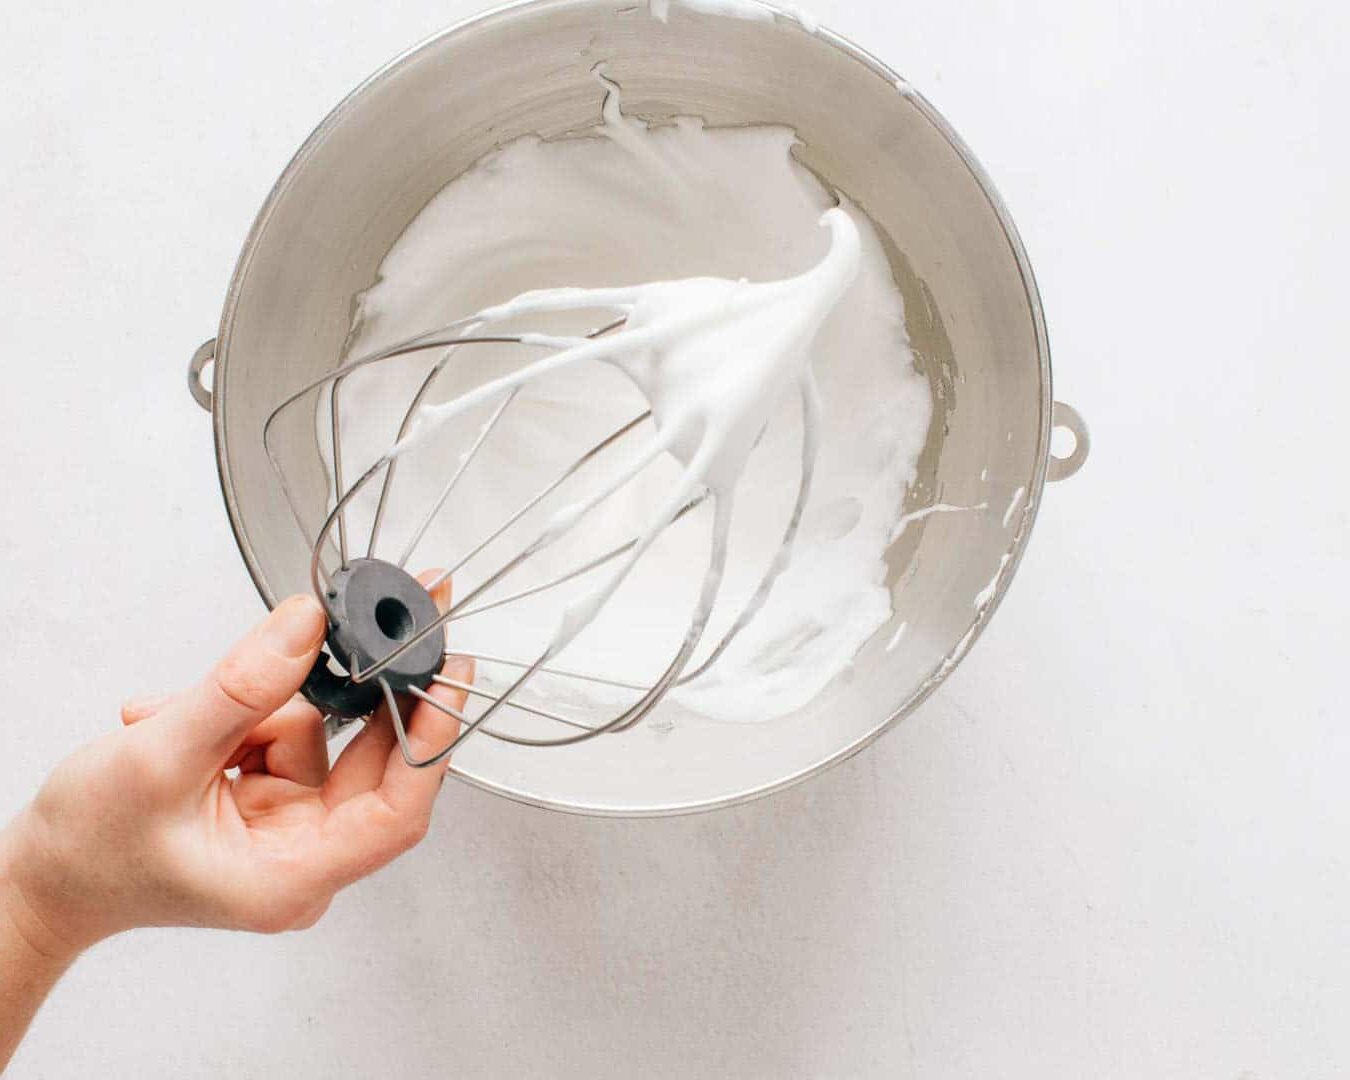
Whip the egg whites and yolks separately
Listen, I get it. That sounds like a lot of effort, and egg white whipping is somewhat intimidating to a person who doesn’t make meringue on the reg.
But in this cake recipe, I tested with over-beaten whites, under-beaten whites, and perfectly-beaten whites and guess what? No difference in the final cake.
So don’t sweat it. Aim for whipping them to medium-firm peaks (when you lift the whisk, the meringue will hold a peak but the very tip will droop a bit), scrape the beaten whites into a separate bowl and move on to beating the yolks without even wiping out the mixer bowl.
I’m not in the business of complicating things.
We’re gonna beat the yolks with some sugar (in lieu of creaming butter with sugar! See? It’s not more work, just different work) and then add the dry ingredients and a splash of milk.
The Simple, Foolproof Way to Roll Up a Swiss Roll Cake
You first roll it up while still hot, in order to allow the cake to set and cool in the correct shape for rolling again later without breaking.


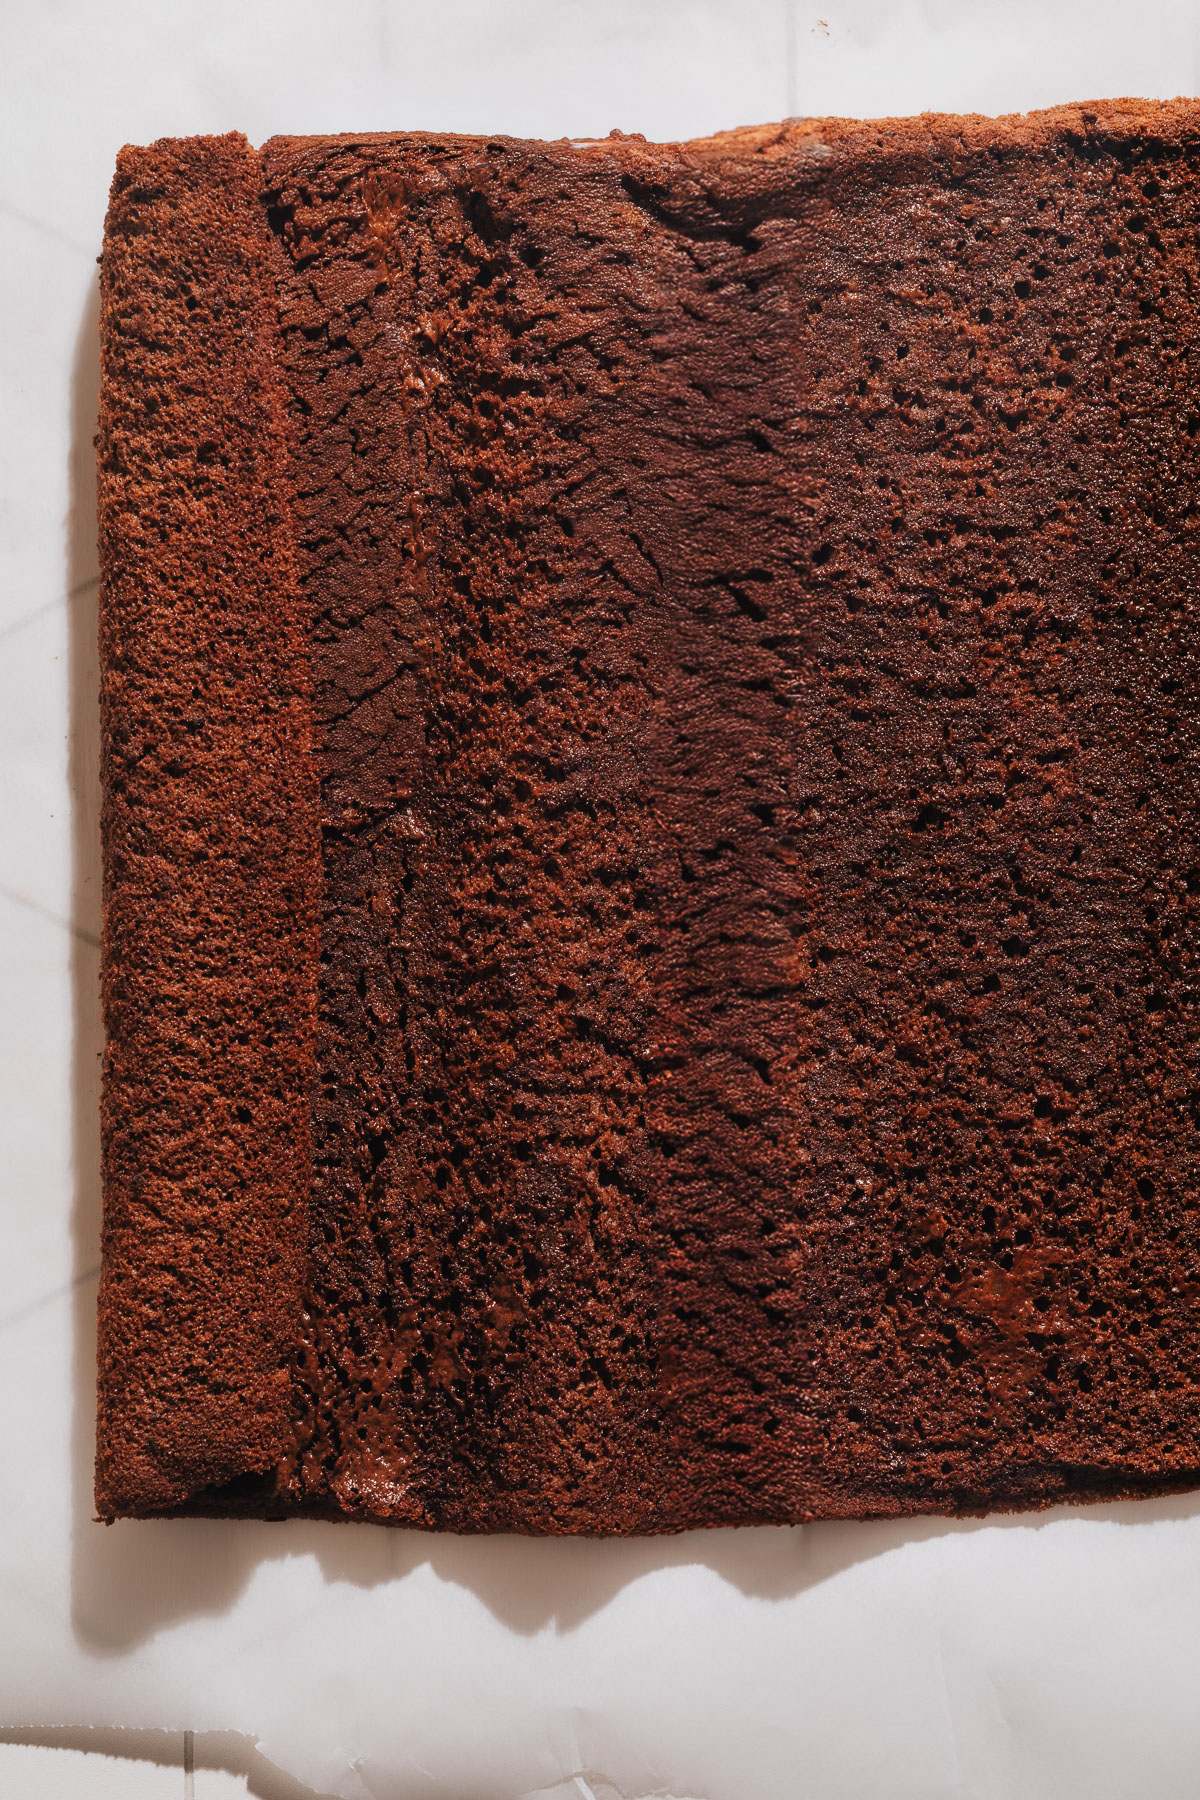
- Let the cake cool a few minutes in the pan until you can handle it without burning your fingers.
- Leave the cake in the pan, and start rolling it up with the parchment paper, starting with the short edge.
- Transfer the wrapped roll to a cooling rack to cool completely.
- Gently unroll it once it is completely cool. Small tears hide inside, or disappear under confectioners’ sugar.
Traditionally, rolled cakes cake are flipped onto a sugar-dusted tea towel, which is awkward and messy. Parchment paper is nonstick, so I tested just rolling it on the paper it was baked on. Turns out there is no reason to transfer it at all!

To Make it A Yule Log
Follow my Buche de Noel recipe, that uses this cake and filling as the base. It’s one of my favorite chocolate Christmas desserts.
Decorate the roll cake with a simple microwave ganache and top it with sugared cranberries and sprigs of fresh rosemary.
Easy Chocolate Swiss Roll Cake
Ingredients
For Cake
- 4 large eggs separated
- ½ + ⅓ cup granulated sugar (divided use)
- 1 tsp pure vanilla extract
- ½ cup all-purpose flour (64 g)
- ⅓ cup cocoa powder (35 g)
- 1 tsp baking powder
- ⅛ tsp fine sea salt
- ⅓ cup milk
- Confectioners’ sugar for dusting
FOR CHOCOLATE CREAM FILLING
- 1 cup whipping cream
- 2 ½ tbsp cocoa powder
- ¼ cup confectioners’ sugar
- ½ tsp vanilla extract
Instructions
For cake:
- Preheat oven to 375ºF. Line an 11×17" sheet pan with parchment paper leaving an overhang on the short edges and grease the paper.
- Beat egg whites in a stand mixer with whisk attachment on medium speed until foamy. With the mixer running, gradually add 1/2 cup of the sugar, about a tablespoonful at a time, beating to incorporate before adding more. Increase speed to high and beat until medium-stiff peaks form.
- Scrape egg whites into a separate bowl and return bowl to the stand mixer (don't bother washing it).
- Add egg yolks to same stand mixer bowl with remaining 1/3 cup sugar and beat with whisk attachment on medium speed until creamy and lightened in color, about 2 minutes.Reduce speed to low and beat in vanilla.
- In a separate bowl, whisk together the flour, cocoa, baking powder and salt.
- Add 1/3 of the flour mixer to stand mixer with yolks and beat on low speed to incorporate. Add 1/2 of the milk and beat on low again. Repeat with remaining flour mixture and milk (for a total of 3 additions of flour mixture and 2 additions of milk). Only beat until just combined.
- Remove mixer bowl from stand mixer. Fold in egg whites with a large silicone spatula.
- Scrape batter onto prepared pan and spread evenly into the corners. Bake 10-12 minutes, or until it loses its shine and the centre feels slightly springy.
- Let cool a few minutes in the pan until you can handle the cake without burning your fingers. Roll the cake up in the parchment paper, starting with the short edge, and transfer the roll to a cooling rack to cool completely.
For chocolate cream filling:
- Whip cream on high speed of electric mixer with whisk attachment until soft peaks form. Sift in cocoa powder and confectioners' sugar and continue whipping until medium-stiff peaks form.
To assemble:
- When cake is completely cold, gently unroll it on a work surface. Leave it on top of the parchment.
- Spread the chocolate cream filling evenly over the cake. Roll it back up (gently peeling it off the parchment this time) and place it seam-side down on a serving dish. (You can use a rimless baking sheet or pizza peel to transfer it if you're worried about it breaking.)
- Trim away the less-than-pretty end slices and discard if desired. Cover with plastic wrap and refrigerate if not serving right away. (It's easier to slice if you chill it for 2 hours.) Sprinkle the cake with confectioners' sugar just before serving. Can be made 24 hours in advance.
Notes
- ¾ cup heavy cream
- 6 oz finely chopped dark chocolate
- In a microwave-safe bowl, combine the heavy cream and chopped chocolate.
- Microwave in 20-second bursts, stirring well between each, until the chocolate is completely melted and the mixture is smooth.
- Let it cool slightly to thicken before spreading on your Yule log.
Nutrition
Nutrition information is automatically calculated, so should only be used as an approximation.


Hi! Am I able to half this recipe as I do not have an 11×17 pan and my ovens are actually smaller wall ovens so can’t even fit a 11×17 pan if i bought one! Thanks! If i can half this recipe, what size pan should I use and what baking time? Thank you!
Hi Mel! Great question — I haven’t personally tested halving this one, but here’s what I’d try: halve all ingredients and use a 9×13″ pan lined with parchment, spreading the batter as thinly and evenly as possible into the corners. Start checking at 7–8 minutes — it’s done when the surface loses its shine and the centre feels slightly springy, same cue as the original. The rolling method stays the same: roll it up in the parchment while still warm, cool completely in that shape, then unroll, fill, and re-roll. Hope you love it — let me know how it turns out!
– Jenn
Can I make this ahead of time and freeze it
Hi! Yes, you can absolutely make the Chocolate Swiss Roll Cake ahead and freeze it. Just wrap it well in parchment, then plastic wrap, and finally foil. It’ll keep nicely for up to 2 months. Thaw overnight in the fridge and dust with sugar (or add ganache) before serving so it looks fresh.
its such a wonderful roll cake keep up the fantasic work
Such a beautiful cake! I love that swirl. The flavors sound absolutely fantastic too. Yum!
So tasty! I’ll definitely be making this one again. It looks so pretty on the dessert table.
OOh so light and airy and full of chocolate flavor. Loved it!
I loved the tips for rolling. They will also work for jelly rolls!
This Swiss roll was perfectly light and delicious. I appreciated the tips for rolling this as that’s where I usually get stuck. Thank you for such a detailed recipe.