This Garlic Ginger Chicken recipe makes fall-apart tender chicken draped in the most irresistible sticky garlic honey ginger sauce. It’s a wildly delicious dinner that tastes like Chinese takeout and is almost too easy to be true. Don’t miss my expert tips and tricks for the juiciest, tastiest results!
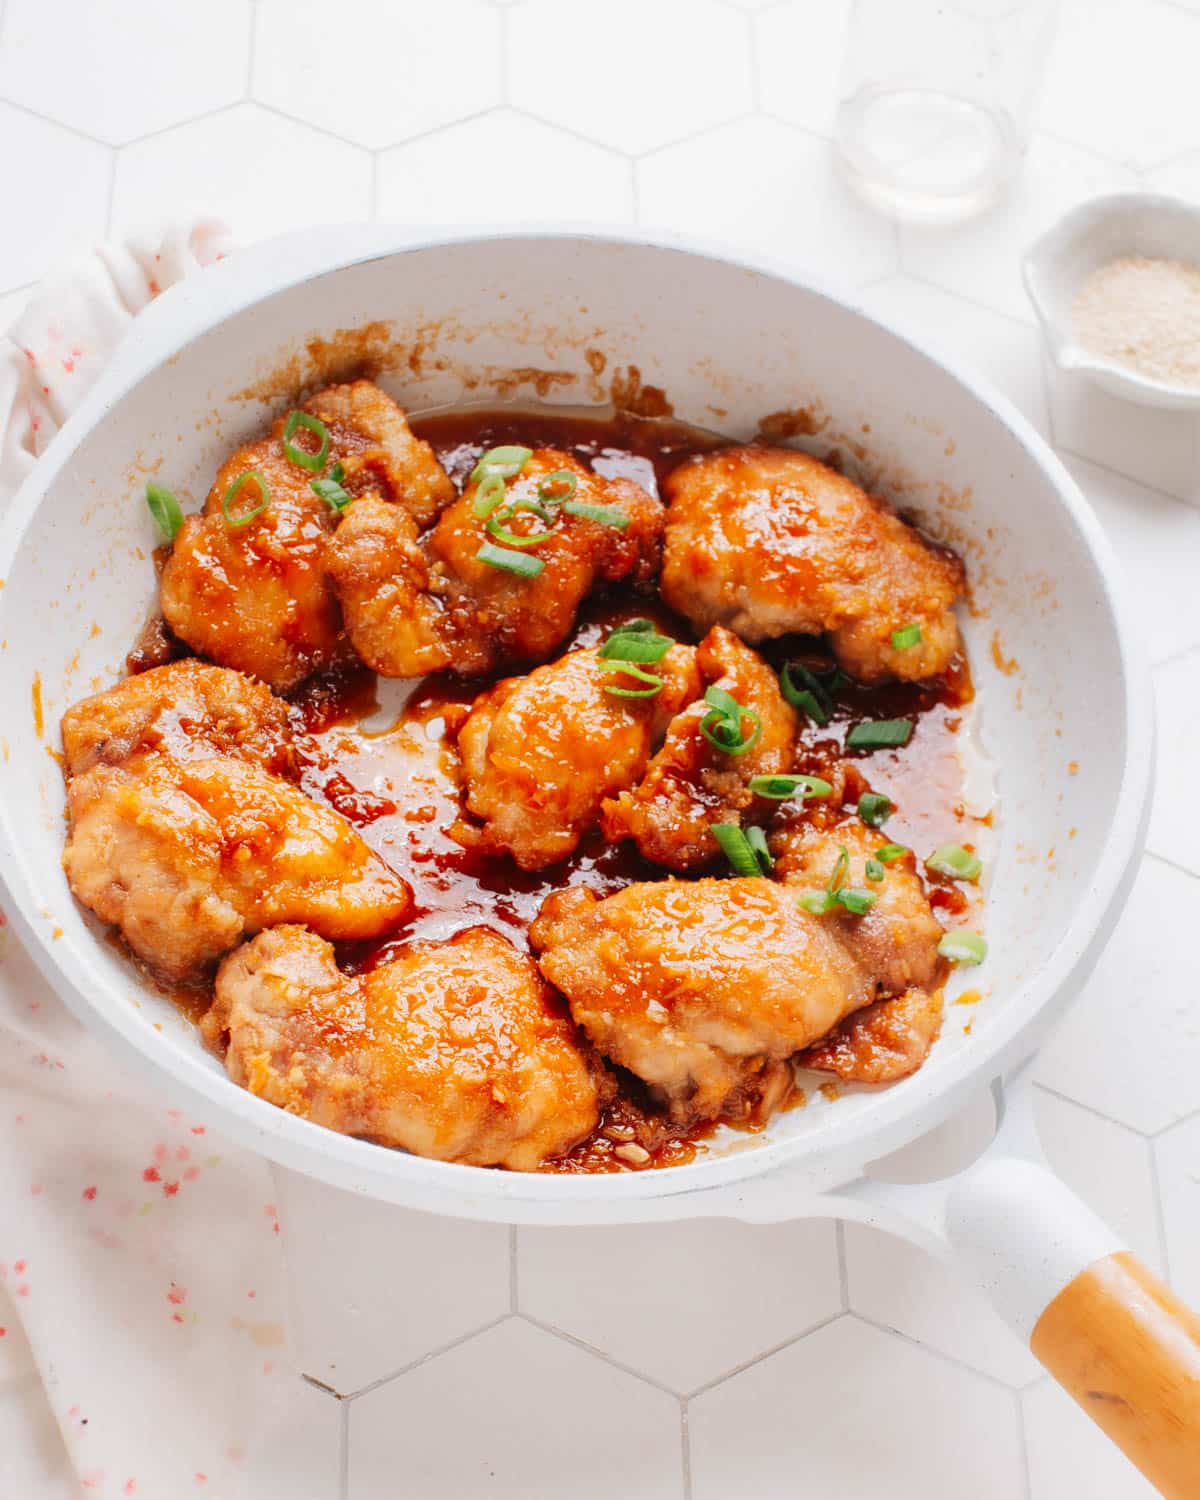
Table of Contents
- Gather Your Ingredients for Garlic Ginger Chicken
- How to Make Ginger Garlic Chicken: Easy Step-by-Step Directions
- Expert Tips and Tricks
- How to Serve Garlic Ginger Chicken
- Make Ahead and Storage Tips
- FAQs
- If You Love Quick, Easy Asian Takeout-Inspired Recipes, You Must Also Try:
- Garlic Ginger Chicken Recipe
Gather Your Ingredients for Garlic Ginger Chicken
This has become one of my go-to chicken recipes. Ready to whip up some incredible Garlic Ginger Chicken?
- Boneless skinless chicken thighs: Our protein, ready to be transformed into juicy, flavorful bites. Boneless skinless chicken breasts are ok as a substitute, but either slice them in half crosswise or pound them out to even thinness and be careful not to overcook them as they dry out in a way that thighs do not.
- Cornstarch: It’s all about that crispy coating, friends.
- Kosher salt: Pumps up the flavor volume in our chicken.
- Avocado oil: Perfect for high-heat cooking and adds a little nuttiness to the mix.
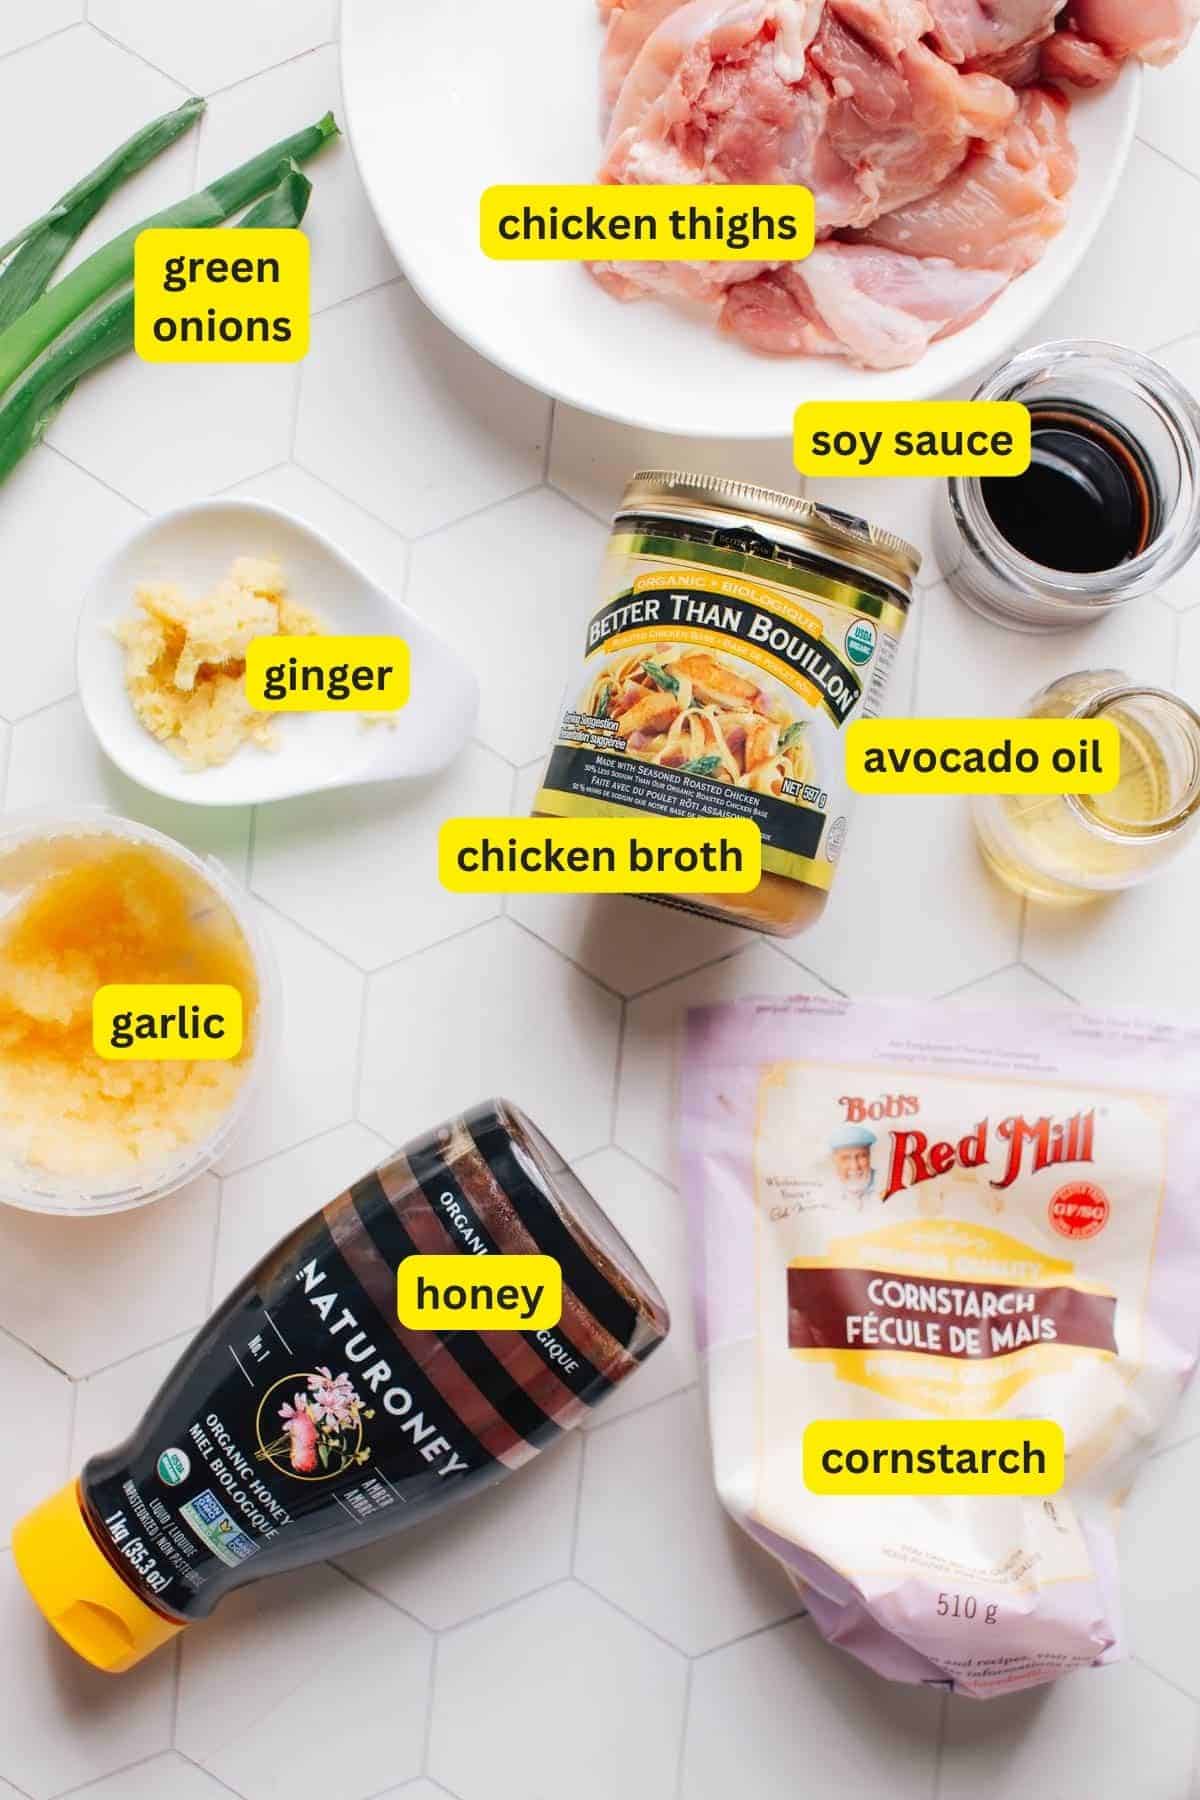
For the Honey Garlic Ginger Sauce:
- Honey: A hint of sweetness to keep things interesting. Brown sugar works, too.
- Chicken broth: Sneaky flavor enhancer.
- Soy sauce: Umami booster, with just the right touch of saltiness.
- Minced garlic cloves: Fresh is best, pre-minced in a jar will do on a weeknight.
- Fresh ginger: Warms the belly and tastes so good.
- Green onions: For that crisp, fresh finish on top.
If you love the sweet and savory teriyaki sauce flavors in this dish, you’ll also love my Teriyaki Salmon recipe.
How to Make Ginger Garlic Chicken: Easy Step-by-Step Directions
Alright, let’s get cooking, friends:
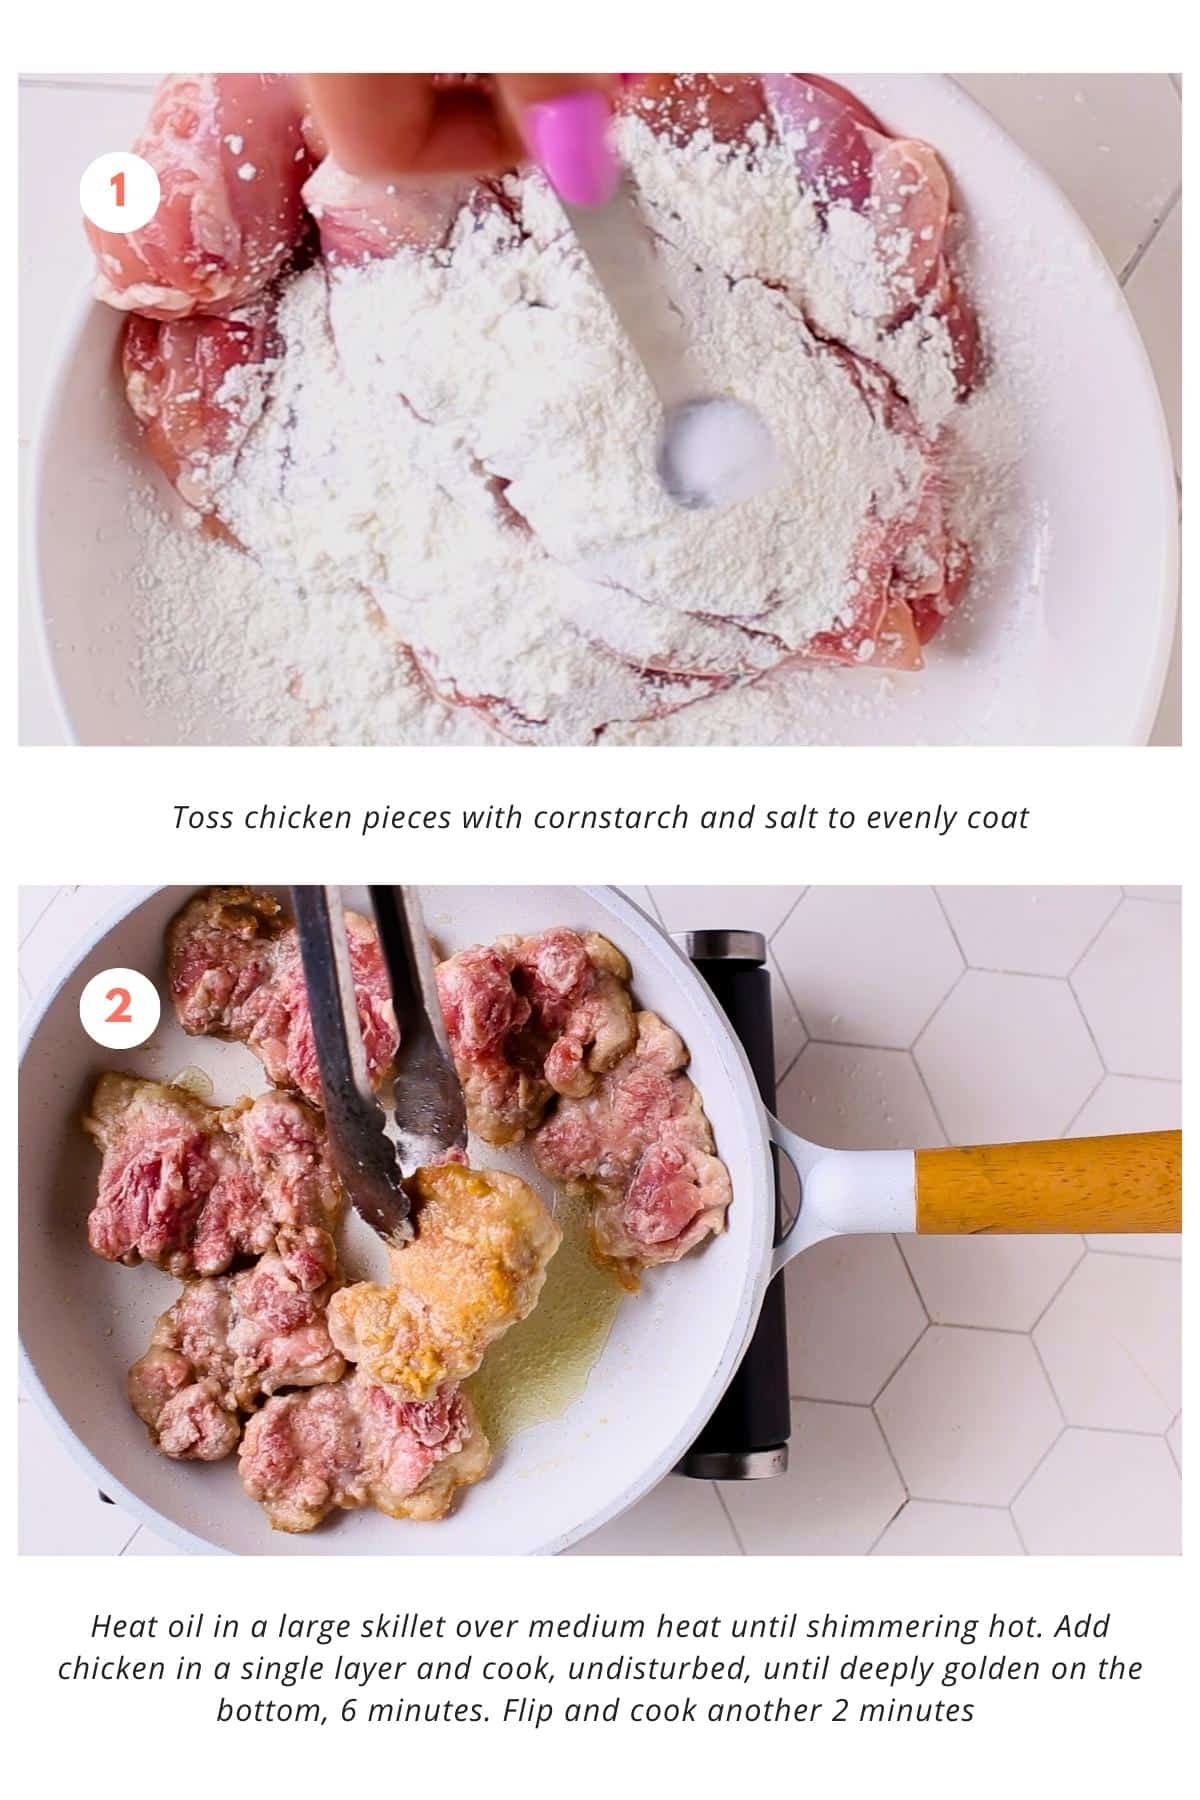
- Chicken, meet cornstarch: Toss ’em together and give your chicken a nice cornstarch and salt massage. We want every piece evenly coated. This creates a dry surface on the chicken to encourage browning, while locking in moisture.
- Heat is on: turn up the stove to medium-high heat and let that chicken sizzle in the oil till it’s golden and gorgeous.
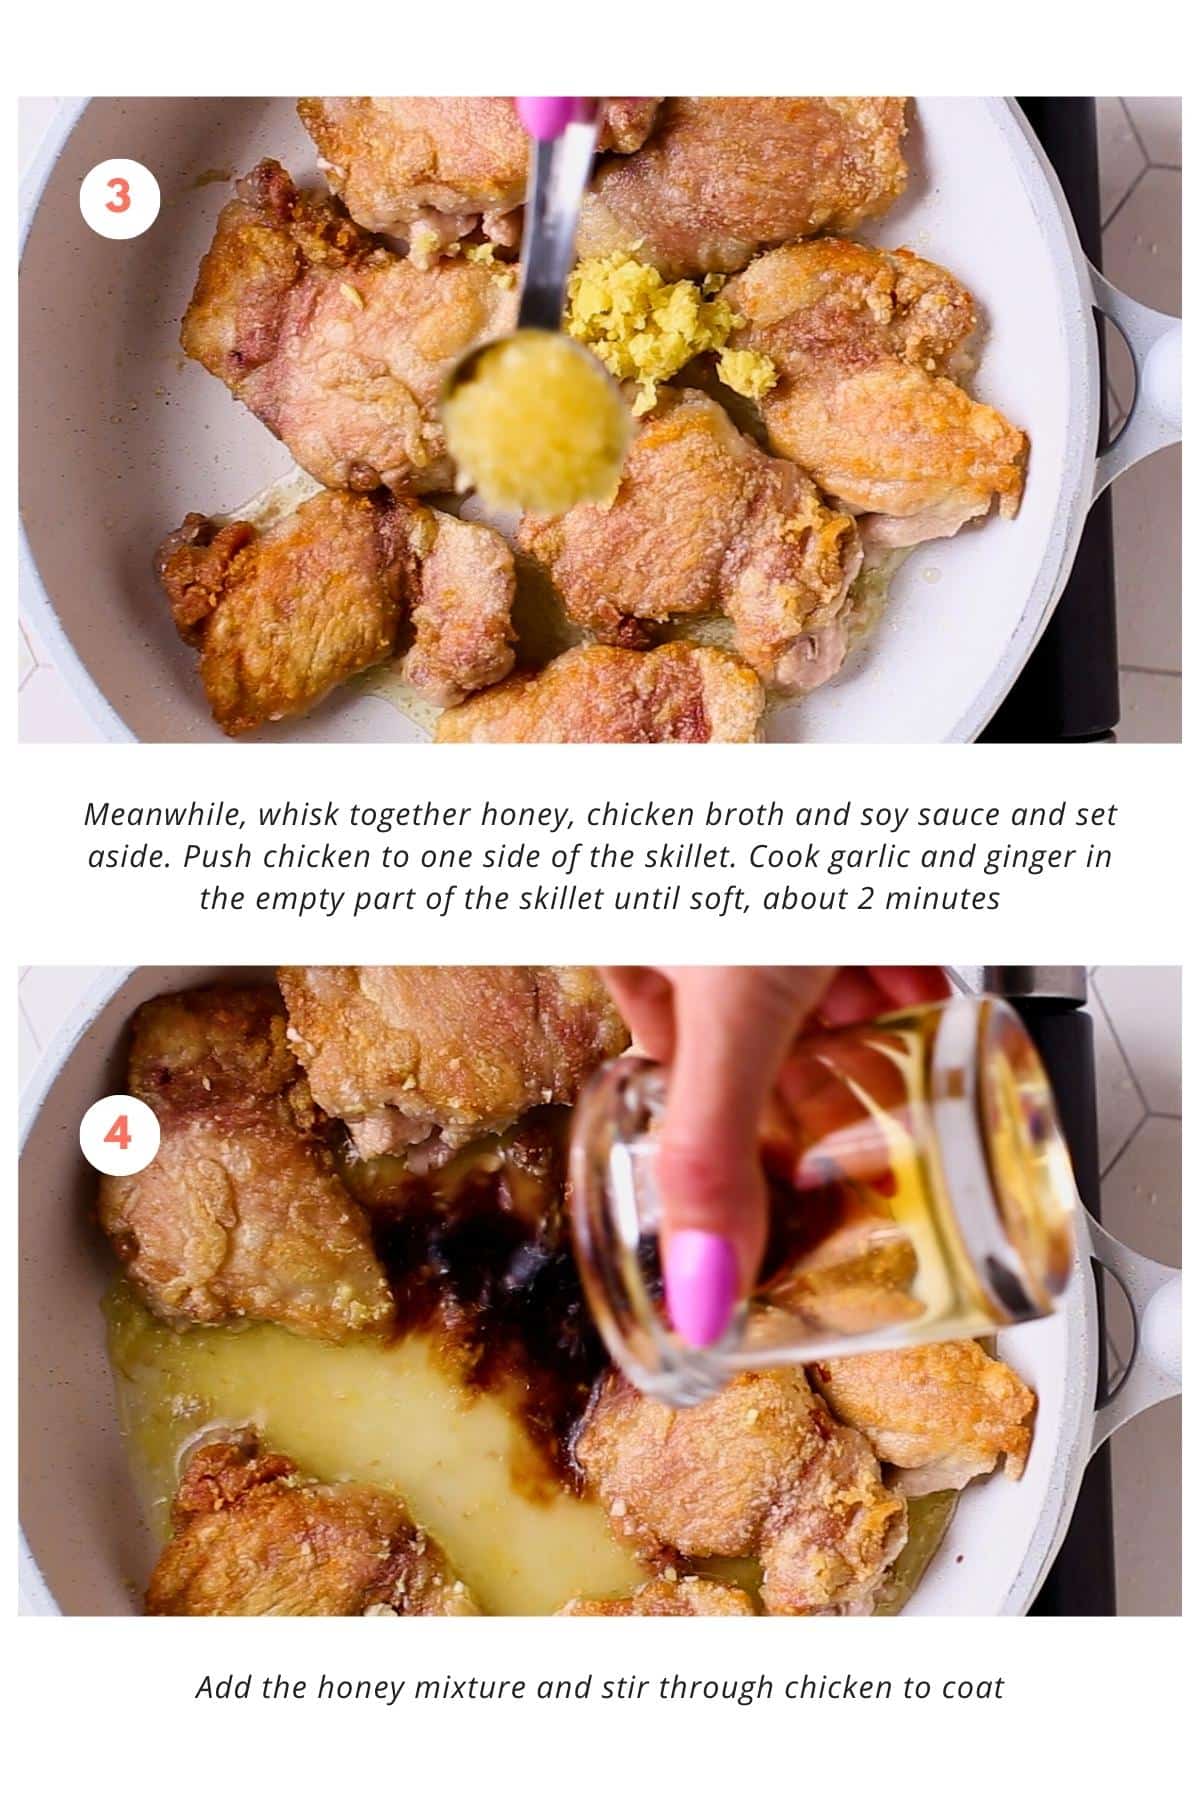
- Sauce prep: while your chicken’s getting all crispy, whisk up your honey, broth, and soy sauce. Or just have them measured out and pour them all in the pan without dirtying another bowl.
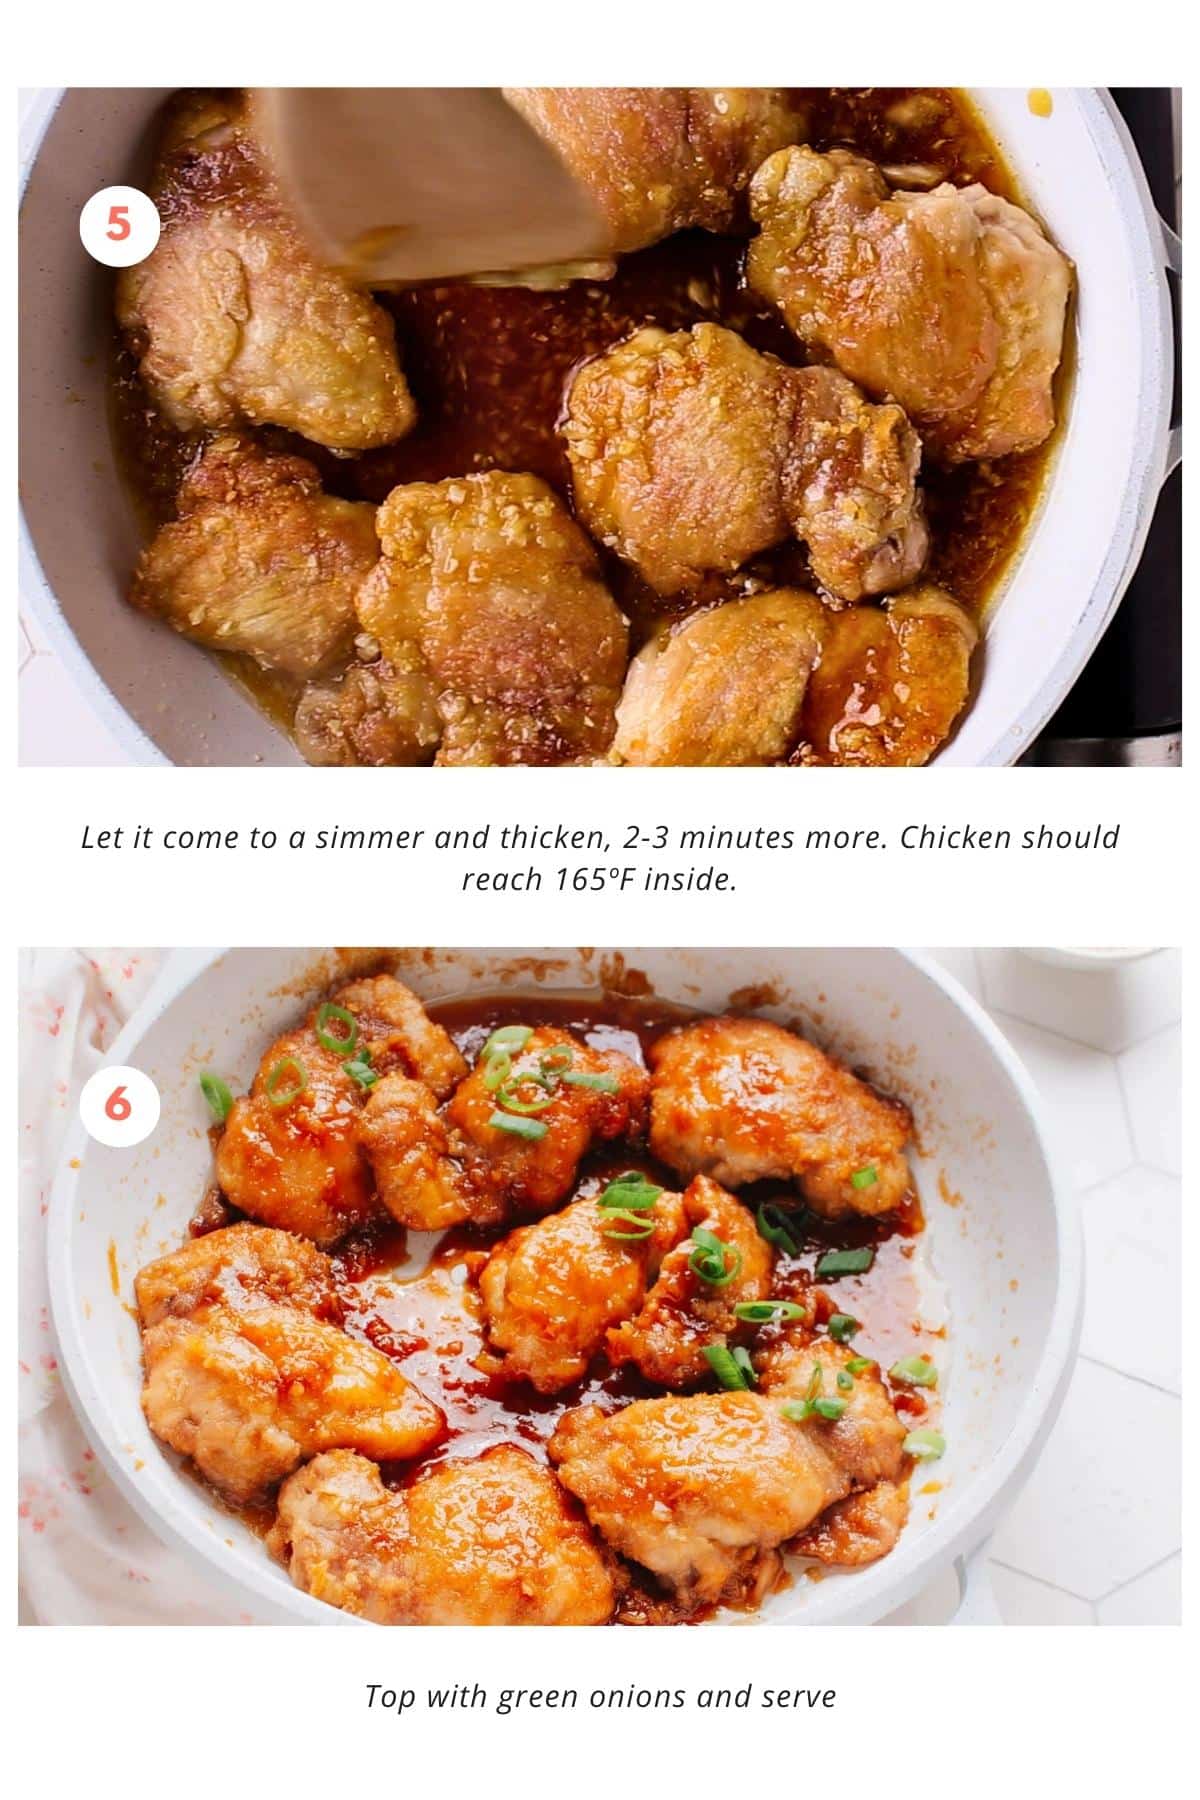
- Garlic and ginger time: carve out a little space in the skillet and let the garlic and ginger mingle till they’re soft and aromatic.
- Blend and simmer: it’s time for the honey mix to join the party. Stir it in, let it simmer, thicken, and work its magic.
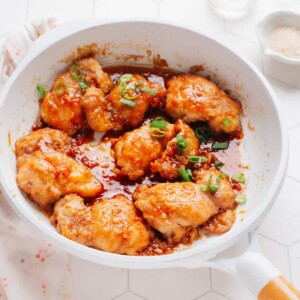
- Top it off: the last step is to sprinkle with green onions and voila! A few toasted sesame seeds are also a pretty finish.
Expert Tips and Tricks
Unlocking the secrets of a top-tier Garlic Ginger Chicken is easier than you think! Let’s spill the tea on some culinary wisdom:
- Fresh is best: Using fresh ginger and garlic can dramatically level up the flavor of your dish. Remember, it’s the little things that count.
- Chicken prep: A cornstarch coating makes the surface of the chicken dry, which helps to create a golden crust. It also locks in the moisture, ensuring a juicy bite.
- Golden rule: Don’t overcrowd your pan while frying the chicken. Giving each piece some space helps them get that gorgeous golden-brown crust.
- Stir fry science: Add the ginger and garlic after you’ve given your chicken a good sear. This will prevent them from burning while ensuring their flavors infuse the dish.
How to Serve Garlic Ginger Chicken
Let’s make it a complete meal! Here’s how I love to serve my Garlic Ginger Chicken:
- Over fluffy rice: Pile that sticky goodness over a bed of fluffy jasmine or white rice. It’ll lap up that garlic-ginger glaze like a charm.
- Noodle nest: How about twirling some noodles around your fork with chunks of this tangy chicken? Choose from chili oil ramen, chow mein noodles, or any simple boiled noodle you love.
- Stir-fry friend: Use the same pan to whip up a stir-fry with your favorite vegetables like broccoli, zucchini, and carrots, and this easy stir fry sauce for a one-pan wonder full of goodness.
- Wrap it up: Wrap a spoonful in a crisp lettuce leaf for a fresh, light bite that’s full of flavor. Top with some red pepper flakes and fresh cilantro. I love this one, truly.
- In a bowl: Create your own Asian-inspired bowl with brown rice, quinoa or cauliflower rice, edamame, cucumber, pickled onion, and a dollop of spicy mayo. Trust me, it’s a game-changer.
Make Ahead and Storage Tips
Who says you can’t have tomorrow’s lunch sorted while enjoying tonight’s dinner? With these make-ahead and storage tips, your future self will thank you:
- Cook now, sauce later: Cook the chicken and keep it separate from the sauce. When you’re ready to eat, heat them together for that just-cooked freshness. A weekday win!
- Freeze it: Cool the cooked dish, portion it into freezer-safe containers, and freeze. You’ve just prepared your own ready meals. Take that, freezer aisle!
- Fridge-friendly: Your Garlic Ginger Chicken will comfortably chill in the fridge for up to four days, which means you’ve got lunch (or dinner) at your fingertips.
- Reheating like a pro: Use a microwave or stovetop for reheating. Just make sure it’s piping hot before you tuck in. Safety first, folks.
- Container conundrum: Store your masterpiece in airtight containers. This helps keep the flavors locked in and prevents your fridge from smelling like a spice market (although, that doesn’t sound too bad, does it?)
Remember, the only thing better than a tasty meal is a tasty meal that’s ready when you are. Go ahead, stash some away for a flavor-packed, stress-free meal. You’ve earned it!
FAQs
You’ve got questions, we’ve got answers. Let’s tackle some of your burning curiosities:
Follow our simple step-by-step guide above, and you’ll be serving up a ginger chicken to be proud of in no time.
Many Chinese dishes use ginger, such as Kung Pao Chicken, Ginger Beef Stir Fry, and, of course, our very own Garlic Ginger Chicken.
That depends on the size of the pieces. For our recipe, it should take about 6 minutes for the first side and 2 minutes after flipping.
Nope, they’re different families but make a killer team in the kitchen.
Add them after you’ve seared the chicken. This prevents them from burning and ensures their flavors permeate the dish.
If You Love Quick, Easy Asian Takeout-Inspired Recipes, You Must Also Try:
If you are as obsessed with Asian takeout as I am, you must try some more of my Takeout Fakeout recipes:
- Hunan Shrimp: Chinese shrimp with a garlicky kick, ready in under 30 minutes!
- Chicken and Broccoli: Quick, healthy dinner.
- Chow Mein Noodles: a favorite takeout dupe.
- Thai Red Curry: spicy red curry coconut chicken.
- Pad Woon Sen (Thai Glass Noodle Stir Fry): Thai noodles with a flavor explosion and veggies to balance it all.
- Gochujang Chicken: Flavorful Korean-inspired chicken dish featuring the spicy and savory gochujang sauce.
- Orange Chicken: Sweet, tangy, and crispy – the diva of Chinese-American dishes.
- Thai Basil Pork: Thai classic with a punch of savory flavors and fragrant basil.
- Honey Garlic Chicken: Sticky, saucy, and simply irresistible. The ultimate easy chicken fix.
Garlic Ginger Chicken
Equipment
Ingredients
- 1 ½ lbs boneless skinless chicken thighs about 6
- 4 tbsp cornstarch
- ½ tsp kosher salt
- 3 tbsp avocado oil or other high smoke point oil
- 4 tbsp honey
- ⅓ cup chicken broth
- 2 tbsp soy sauce
- 1 tbsp minced garlic
- 2 tbsp fresh ginger grated
- 2 green onions sliced
Instructions
- Toss chicken pieces with cornstarch and salt to evenly coat.
- Heat oil in a large skillet over medium heat until shimmering hot. Add chicken in a single layer and cook, undisturbed, until deeply golden on the bottom, 6 minutes. You’ll do most of the cooking on the first side. Flip and cook another 2 minutes (don’t worry about cooking it through yet).
- Meanwhile, whisk together honey, chicken broth and soy sauce and set aside.
- Push chicken to one side of the skillet. Cook garlic and ginger in the empty part of the skillet until soft, about 2 minutes.
- Add the honey mixture and stir through chicken to coat. Let it come to a simmer and thicken, 2-3 minutes more. Chicken should reach 165ºF inside.
- Top with green onions and serve.
Video
Notes
Nutrition
Nutrition information is automatically calculated, so should only be used as an approximation.


Yum yum. This looks so good! I can’t wait to try this recipe. BTW, is it okay to substitute chicken breast for the thighs?
Maureen | http://www.littlemisscasual.com
I will be making this dish this weekend. I love bold flavours so I can’t wait!!!
Just made this and I’m blown away! Seriously tasted like something from a restaurant, and the tips in the recipe were a lifesaver.
I’m officially obsessed with this! The sauce was everything – sweet, tangy, and with a kick of ginger. So good!
This Garlic Ginger Chicken recipe is a game-changer! The chicken practically melts in your mouth, and that garlic honey ginger sauce is a taste explosion.
Tried this Garlic Ginger Chicken last night and my taste buds were in heaven! The chicken was so tender and that sauce, wow!
I made this Garlic Ginger Chicken and oh my goodness, the flavors are out of this world! That sticky honey ginger sauce is pure perfection Jenn.
I just made this and oh my! Its a keeper for sure…absolutely delicious..thank u so much
I’m so happy to hear that you enjoyed it!
This was really yummy. Great flavor.
Hello! This recipe looks delicious and I’m planning on making it this week… but I do have a quick question with regards to preparation of the chicken thighs: do you clean off the fat (typically there are little blobs of fat attached to the thighs) for the purposes of this recipe OR… does it melt off sufficiently that you don’t end up with biting into any small bits after cooking?
The fat can render down during cooking and add moisture and flavor to the chicken but if you prefer a cleaner piece of meat, you can easily trim these off using kitchen shears or a sharp knife.